I threw together a pickup game of War at Sea at the local game shop. We were a little short of time due to too much jibber jabber with Game Store Tony.
We decided to do a convoy scenario. The basic notion was that an International Flotilla escorts a munitions convoy to Finland during the Winter War.
I think the convoy scenario, as written, is very difficult for the convoy payer to win. Even with a 20-point bonus (100 scenario points to just 80 for the intercepting player) there are just too many threats to counter and the intercepting player only need to get lucky three times. If three convoy ships get sunk then the attacker wins.
I took the convoy, although not expecting too much. As it turned out the convoy nearly made it.
Besides the five merchant ships the convoy escort included the following:
Finland
Vainamoinen - coast defense ship
2 x B-239 Buffalo - fighter
Sweden
HMS Gustav V - coast defense battleship
HMS Gotland - scout cruiser
2 x HMS Goteborg - destroyer
Poland
ORP Blyskawica - destroyer
ORP Orzel - submarine
Germany
2 x S-Boat - torpedo boat section
The intercepting fleet was all Soviet
Kirov - heavy cruiser
2 x Krasni Krim - light cruiser
4 x Gromkiy - destroyer
S-13 - submarine
2 x Il-2M Sturmovik - attack plane (yes, I know the plane date is 1943. I overlooked it.)
We used the standard map set up listed in the rulebook for the convoy scenario. The notable feature of that map is that it includes two islands on the Soviet side of the map.
The Soviet destroyers quickly moved off to each flank and laid mines between the islands and the map edge, which induced the convoy to take a central route.
First blood went to the Convoy side, which sank a destroyer with a torpedo attack from the S-boats. Some long-range fire from the coast defense ships, spotted by the Gotland's seaplane crippled the Kirov. Unfortunately a Sturmovik got through the air defenses and took out a freighter. I figured the two Russian bombers were the main threat. There was virtually no chance I could shoot them down so the best I could hope for was to keep aborting them. Their bomb attack was powerful enough that an attacked freighter was nearly doomed.
The Soviets were annoyed by the spotter plane "buzzing around" and two turns later when the bombers returned they took out the Gotland. Meanwhile the Kirov and S-13 were sunk and the surviving Soviet ships pulled back. The S-boats hid in an island zone. As the convoy slowly advanced, long-range fire from the coast defense ships banged up the Soviet surface flotilla severely while the Buffalos and air defense fire from the escorts aborted the Il-2s. So far, so good. The S-Boats made a death run at one of the light cruisers that came to naught, but it was becoming clear that the Soviet fleet was destined for destruction under the big guns of the convoy escort, so they made a mad dash at the enemy. All were promptly sunk, but in the melee the Sturmoviks sunk one more freighter and a shot from a light cruiser damaged another one. The Finnish coast defense ship was also crippled by a torpedo hit.
The next few turns went at a rapid clip as all the Soviets had left were the two airplanes, which could only fly every other turn. The Buffalos and escorts did their best, but eventually the Sturmoviks got a shot. A very fortunate die roll only added one more damage point to the freighter. It was crippled, but still there. Finally the freighters reached the board edge and the Sturmoviks had one more try. One was aborted but the second one plastered the crippled freighter and sent it down.
It was the closest I've seen the convoy come to making it, but it still fell short.
Thursday, December 30, 2010
Tuesday, December 28, 2010
Persian Incursion play
Spanish player Edgar Gallego and I are going to attempt a PBeM playthrough of a game. I'll post updates as we move along.
Monday, December 27, 2010
Dranesville Battle Cry session

Game Store Tony and I continued our series the other day. Recent sessions at Greenbrier, Va. and Belmont, Mo. were a split, with the boys in blue coming out on top at Greenbrier and the rebels at Belmont.

The Battle at Dranesville was another in the series of little-known 1861 skirmishes that Battle Cry has dug up. Most standard histories devote very little time and ink to the fighting that happened between First Bull Run and the 1862 campaigns in the Valley, the Peninsula and Shiloh. Compared to the later fighting the casualty toll was low, although many of them were pretty important strategically. They were especially critical in keeping the border states in the union (esp. Missouri) and in splitting off the western counties of Virginia into the new state of West Virginia.
The Dranesville affair was small, about a brigade's worth of troops on each side. Historically the federal force drove J.E.B. Stuart from the field, but in our game things went badly for the Union troops right from the start as the elite "Bucktails" unit fell quickly under a hail of fire (hot dice) from the Secesh side.
As can often happen in Battle Cry and its ilk the bad stuff snowballed and the Union was never able to turn things around, resulting in a fairly lopsided 6-2 win for the Rebels. As has been usual for Game Store Tony, his cavalry took it hard and both flags came from eliminated cavalry units. I told him that at this rate I'll have to change his nickname from "Stonewall" to "Kil-cavalry."
Unfortunately I was never able to finish off an infantry unit, even though several were reduced to a single figure. But each time the unit was saved when a flag also retreated the damaged unit out of range or behind a ridge. In contrast the federal units were too stalwart to retreat from fire and died where they stood.
Sunday, December 26, 2010
A Blizzard of Blows -- Battlelore Session report

Deciding not to let a good blizzard go to waste, Young general and the Old Warrior hauled out BattleLore for a go.
We reviewed the rules, as it had been quite a while since we played, but it turned out Young general didn't need the help. Ahem.
We played the next game in the Creatures expansion, the Magic Vortex, which introduces the Rock Elemental. As usual the creature didn't help much, as will be recounted below.
I had the creature-equipped Standard Army, which in this case broke with tradition and had the Goblins on its side and the Dwarves with the Pennant Army. This suited Young general fine, as he's no fan of the Goblinoids, regarding them as just this side of useless.
Young General's War Council comprised a Level 3 Wizard, and Level 1 Commander, Cleric and Rogue. Old Warrior also went with a Level 3 Wizard, the mandatory Level 1 creature and rounded out his council with a Level 1 Commander and a Level 1 Warrior.
Old Warrior's plan was to pick away at the Pennant Army until he gathered enough Lore to be bale to deploy the Rock Elemental against a weak part of the Pennant line.
And the plan might have worked, too. Several Pennant units were reduced and one was killed off in melee. The Old Warrior drew a Fireball in the initial hand and gave into the temptation to use it, incinerating a Red Banner Heavy Cavalry unit. This was quite satisfying, but in retrospect may have been a mistake, as it took a few more turns to build up enough lore again to deploy the Rock Elemental and by then it was too late.
With a 2-1 lead and a fair number of battered unit in Young General's Pennant army things weren't looking too bad for the Standard troops -- and then Young General dropped the boom. He had been hoarding Lore and finally had enough to play an Assault Card. (It cost him 16 lore because he didn't have a Warrior loremaster.) Well, he had quite a few units within range and was able to slam into the Old Warrior's host up and down the line! By the time the carnage ceased the Standard army had lost four units and the score was 5-2 in Young General's favor. Desperately the Old Warrior's wizard conjured up the Rock Elemental, who did his duty and wiped out a unit for a third flag, but it wasn't too hard for Young General to find that sixth flag and the win as he jumped all over the Goblinoid Lizard riders.
And so that was that. A 6-3 win for the creature-less Pennant army.
Old Warrior was left ruefully considering the possibility that the Rock Elemental, unlike so many of the other creatures, seemed to have serious potential, but he gave up most of it by indulging in a dramatic, but ultimately indecisive fireball.
Next up is Spider river, where Old Warrior will get two chances to see if a creature can make the difference. So far they seem to be more hindrance than help.
Friday, December 24, 2010
Battle Cry 150th Anniversary Edition -- a review

A decade ago Hasbro's publication of Battle Cry introduced gamer's to Richard Borg's hugely successful and eminently flexible Commands & Colors wargame system (although it wasn't called that yet). The system's popularity is attested to by its sales, rankings and frequency of play. It's flexibility by its iterations depicting World War II (Memoir '44), fantasy/medieval (BattleLore), Classical (Commands & Colors: Ancients) and Napoleonic (C&C: Napoleonic) warfare. While not generally considered simulations, the ganes in the series do succeed in illustrating their eras surprisingly well considering their simplicity.
Of the bunch, the original Battle Cry always remained the most accessible to first-time wargamers. As time went on it and it went out of print it became both avidly sought and often criticized for various design shortcomings as the newer games improved on the game system.
So it's been a welcome development to see a brand new version of Battle Cry come out in time for the 150th Anniversary of the Civil War. Like the earlier version this edition is the easiest entry point for new gamers who want to try out a wargame. Being published by Hasbro means it will have wider distribution than most wargames and indeed, this holiday season I saw some copies for sale outside of the usual game store outlets.
The components of this new version are top notch, with a mounted map board, 46 double-sided terrain hexagon tiles, 14 flag tokens, 9 fieldwork tokens, 102 plastic figures, a sheet of flag stickers, 8 special battle dice, a terrain sheet, a full-clor rule and scenario book and 60 command cards.
The heart of the game system is the command cards, which come in two basic varieties: Section cards which allow a player to "order" units in a specified sector of the board, which is divided into thirds called the Left, Center and Right and Tactic Cards which can affect units in differents sectors and usually provide some special ability or benefit. A player's turn comprises selecting one card from his hand of available cards, performing the orders and actions allowed by that cards and then drawing a new card to replenish his hand. The varying capability of different commanders is reflected by how many cards are in a player's hand. A skillful commander such as Stonewall Jackson may have a 6-card hand while a putz like Pillow may only have three to choose from.
The figures come in four basic varieties: Leaders, infantry, artillery and cavalry, often with several poses. Groups of figures form "units" which are the basic playing element in the game. Each unit is comprised of at least one flag-bearer unit and then several other figures -- three more for infantry, two more for cavalry and artillery, none for leaders. Casualties are reflected by removing figures, with the flag bearer being last. Removing the flag bearer gives the opposing player a flag token, which is the basic measure of victory in the game. The first player to earn a scenario-specified number of tokens wins. In some scenarios flag tokens can also be earned for achieving geographical objectives.
When a unit is "ordered" it can move, and in most cases fire at an enemy unit within range. The movement speed and fire ability of units is related to the unit's real-life capability. Infantry and artillery units move one hex when ordered, mounted units such as leaders and cavalry move three hexes. Artillery can't fire after being ordered, and some terrain reduces the firepower of other units, but generally artillery units can fire five hexes, infantry four hexes and cavalry just one hex. An attack is resolved by rolling the special combat dice, with the number of dice varying on the type of unit firing, the range to the target (-1 die for each hex of range over one) and the terrain occupied by the target. For example, an infantry unit firing at another infantry unit two hexes away on a hill rolls two dice: Four for being an infantry unit, minus one die for range 2 and minus another die for the target being on the hill.
The results of the firing depend on which faces of the special die come up. Each icon that matches the unit type of the target removes one figure. Each "sabers" result also removes a figure, while each "flag" result forces the target to retreat one hex. Very simple and intuitive.
The terrain tiles mean that there's innumerable possible battlefields thatcan be created and the 150th Anniversary edition includes 30 scenarios. The designer has intimated that if sales support it, hasbro plans to publish expansions with more scenarios over the next couple of years during the 150th anniversary of Civil War events.
Compared to its sister games, Battle Cry is still the easiest and most straightforward. The nature of Civil War combat allows the game system to ignore some of the complications that technology (Memoir '44), tactics (CCN and CCA) or magic (BattleLore) introduce to the other games. Civil War armies were essentially mostly infantry (that was armed and trained about the same level) with realtively small numbers of guns and cavalry in support.
While obviously not the last word in simulation, games of Battle Cry are highly entertaining. Skilled play is rewarded, but there's enough luck to keep nearly every battle in doubt until the end. A string of bad rolls or card draws can upset the best of plans, but it doesn't matter because if Mars frowns on you just play the game again -- there's time. A typical game takes less than an hour to play.
The 150th Anniversary Edition of Battle Cry is highly recommended, whether or not you have the older version. Some rough spots in the rules and cards have been smoothed out, the presentation is superior and there are twice aas many scenarios as before with every expectaton of more.
Wednesday, December 22, 2010
Sample rules posted to BoardgameGeek for Persian Incursion
For those interested a sample of the rules have been posted as a downloadable file at Boardgame Geek.
Monday, December 20, 2010
Some very preliminary impressions of Persian Incursion

I've been spending a lot of time studying this game over the last week. It covers an intriguing and important topic and is probably the best unclassified source available for analyzing the potential conduct and consequences of an Israeli attempt to derail Iran's nuclear program through military means. Indeed, I wouldn't be surprised if it's a better analysis than any classified material available to decision makers.
Last night I ran through a few turns of solitaire play in order to get a handle on how the game system would work, how long it will take to play and some preliminary impressions of the game.
One thing is clear -- this is not a 'light' wargame. While considerable efforts have been made to 'streamline' the game, that term is very relative. It's streamlined compared to a full-blown Harpoon 4 game, but by just about any other standard this is still an intricate game that requires a lot of what I call 'staff work.' Each player is tracking the maintenance and mission status of a hundred or more aircraft, every single missile and bomb expended and various events/missions spread over mulitple turns. The designers recommend some sort of mission log to keep track of things and this is not optional in my opinion. You will have to write a lot of stuff down in such a way as to be able to find it later. I started off by making a target/mission worksheet to track each Israeli aircraft and its bombload and while this was helpful, it was also not enough. For my first game I think I'm going to try using a composition book to keep a running record of game information -- a sort of staff journal. The good news is that this should make it easier to write up a good session report afterward. The bad news is that this will necessarily be a game that takes quite a while to play.
I have some initial thoughts on the challenges facing each side.
For the Israelis the biggest challenge will be deciding on a strategy and carrying it out. Mission planning will be critical and it will save a lot of game time if the Israeli player draws up his initial strikes before the game. Indeed, I think the Israeli player should decide on his target strategy before the game and work out all of his planned strikes in at least draft form before the game. This is both realistic and will go a long way to making the game playable in one sitting. The fact of the matter is that the Iranians will not be able to interfere very much operationally with the Israeli strikes and it should be possible for the Israelis to plan all their targeting beforehand, making adjustments as required by events. The largest source of Israeli losses will be through maintenance problems which should be possble to plan for. The Israeli forces are very powerful and capable and can pretty much do as they please -- but they'll have more they want to do than they have airframes available to carry it out. It's not too much to say that the entire Israeli effort depends on just 32 aircraft -- 24 F-15I and 8 tankers.
The Iranian player will have to come to terms with the general ineffectiveness of his military means and it may very well be that his best chance to win will come from the political game's card play.
Offensively, the Iranians have just three options. The easiest is ordering and conducting terror attacks, but these are unlikely to have much effect. Launching ballistic missiles at Israel will be tempting, but the chances of getting through are very low and the chances of having an effect even lower. I haven't had a chance to try out closing the Strait of Hormuz, but I see little reason to think this is much of a strategy either.
Defensively the Iranians have few effective options either, unless the political situation gives them some extra help from Chinese or Russian sources. The long-range and medium-range SAMs are easily countered and it wil be good luck for Iran if the Israelis lose more than a plane or two from those. The mobile, short-rang SAMs are more useful, but they won't have have a chance to shoot down any planes due to the Israeli stand-off range. Their main effect will be to complicate the Isareli mission planning by occasionally shooting down enough precision-guided munitions to potentially screw up an Isareli strike. Their mobility may also give the Iranian player some ability to at least complicate the Isareli task by making a raid less effective than expected.
The Iranian air force, while large, is completely outclassed by the Israeli aircraft and will rarely have a chance to get a shot off. All the Iranian radar-homing missiles are semi-active guided, which means that the Iranian shooter has to spend a turn guiding the missile to the target. Few are likely to live long enough to do that in the face of the accurate and long-ranged AIM-120s carried by all the Israeli fighters. The best chance the Iranians will have will be on the rare occasion when the ground controllers are able to set them up at "dogfight" range where the Iranian heat-seekers will at least have a chance to reach a target regardless of the fate of the Iranian plane that fired it. The Iranians can expect heavy losses.
I'll probably have to play the Israelis the first time because of the requirement to do so much pre-game work, but I think the Iranian side is the more intriguing to play and I hope I get a chance to see what their options are.
Saturday, December 18, 2010
2010 was a big year for Napoleonic battle games
For some reason 2010 turned out to give us a bumper crop of Napoleonic battle games, with Worthington Games' Napoleon's War, followed by Battles of Napoleon from Fantasy Flight and capped off with the eagerly anticipated Commands & Colors: Napoleonics.
All three games were recieved well in the hobby, and each is different enough that a real buff could be excused owning all three, but I have to say that I think the real winner in the bunch is C&C: Napoleonics. I'll go into more detail in a compative review I'm working on, but the bottom line is that C&C: N is simply a lot of fun to play. The Borg game engine has proven remarkably adaptable. All have proven to be very popular in both sales and generally. On Board Game Geek they rank (among wargames) at No. 5 (C&C: Ancients) No. 34 (Battlelore) No. 36 (Memoir '44) and No. 70 (Battle Cry). I expect CCN to join them all in the top 100 as soon as it gets enough votes, but the intitial ratings are very high and if they hold up it may very well end up above CCA. An expansion is already on the way.
The Worthington Game series that includes Napoleon's War has also proven popular among wargamers, although not a real cross-over success like Borg's designs. Still, it's also an entertaining play. This, too, already has a couple of expansions in print.
The real question mark among the three is Battles of Napoleon. I think it's a very interesting game system and highly rated, but it seems a little too involved for some tastes and I wonder if its sales will support any expansions. While it's not the only history-based wargame in the Fantasy Flight line (which also includes Tide of Iron and Wings of War), I'm not sure that it's a comfortable fit for FFG's usual market. Will it survive?
Tuesday, December 14, 2010
Second try at First Manassas

As part of Game Store "Stonewall" Tony's series of American Civil War 150th anniversary refights against "Iron Brigade" Seth we played the new game's First Bull Run scenario a second time.
Frankly, the dice were pretty kind this time around for the Federals. I had no particular strategy in mind -- or I should say the strategy I had in mind was not well-supported by the cards I drew.
I shifted the cavalry unit from the federal right to the left with the aim of using Hunter's leadership (I had two Leadership cards and two Left probe cards in my initial draw) to lead an attempt to dash in the CSA's weaker flank. This was pre-empted in part by Stuart's impetuous advance on the US Right that ended up costing Stuart both of his cavalry commands and giving the US an early 2-0 lead. Additional attempts by Tony to advance likewise seemed to help the boys in blue more than those in gray and before long the flag count was 4-0 in the US favor.
Of course, as is so often the case in Borg's Commands & Colors games no lead is truly secure and Tony's Rebels started to roll better and the Federal forces tried to finish things off. In particular Hunter's cavalry foray on the flank came to a bad end and before long the score was tied at 4 flags all.
Things were not a grim as that may make it seem however, as more of the Rebe units were down to vulnerable levels and the Union was able to pick off stragglers to end up with a 6-4 victory. This was somewhat closer than our first run through and close enough that I don't think the scenario is unwinnable for the Rebels.
Saturday, December 11, 2010
Persian Incursion bottom line
After reading the whole thing through, the bottom line appears to be that doing serious damage, if not destroying, Iran's nuclear program infrastructure is technically and tactically feasible for Israel in the opinion of Larry Bond and his collaborators. In particular, Iran has very little military capability to stop an attack.
On the other hand, Israel needs to persuade at least one of the three powers controlling the air space on the way to Iraq to allow the air strikes to go forward because Iran's program is too extensive for a single air raid to do significant damage. So while the Israelis could certainly fly though the first time without permission, they'd need so many follow-up strikes that flying through without clearance isn't practical. Those three powers are the US (for Iraq air space) Turkey and Saudi Arabia. Bond's judgment is that Israel doesn't have the necessary level of support in any of the three. It's about getting that support and keeping it long enough to matter thant most of the game revolves. And here Iran does have come cards (literally) to play.
I'm definitely needing a partner to try this out. Any takers?
Friday, December 10, 2010
Persian Incursion arrives
Well, it was the first of the November rush of pre-orders to be charged but the last of the bunch to actually arrive. Unlike the other November pre-orders, expansions for Memoir '44 and Small World, the new Commands & Colors: Napoleonics and Battle Cry, which are all primarily entertainment, Persian Incursion is about as Serious a wargame as one could ask for.
Just perusing the components and starting to read it this product is clearly the most comprehensive treatment of one of today's biggest geopolitical and military issues -- could Israel attack Iran to eliminate its nuclear program? It addresses the technical and tactical aspects of a potential strike in excruciating detail (using the Harpoon 4 game engine) and the "game" portion (it's a standalone game, NOT a Harpoon module) provides a framework for examining the potential political and diplomatic consequences.
This is going to take a couple of days to digest, but I expect to say more about it later.
Thursday, December 9, 2010
Breaking in Commands and Colors Napoleonics in a big way
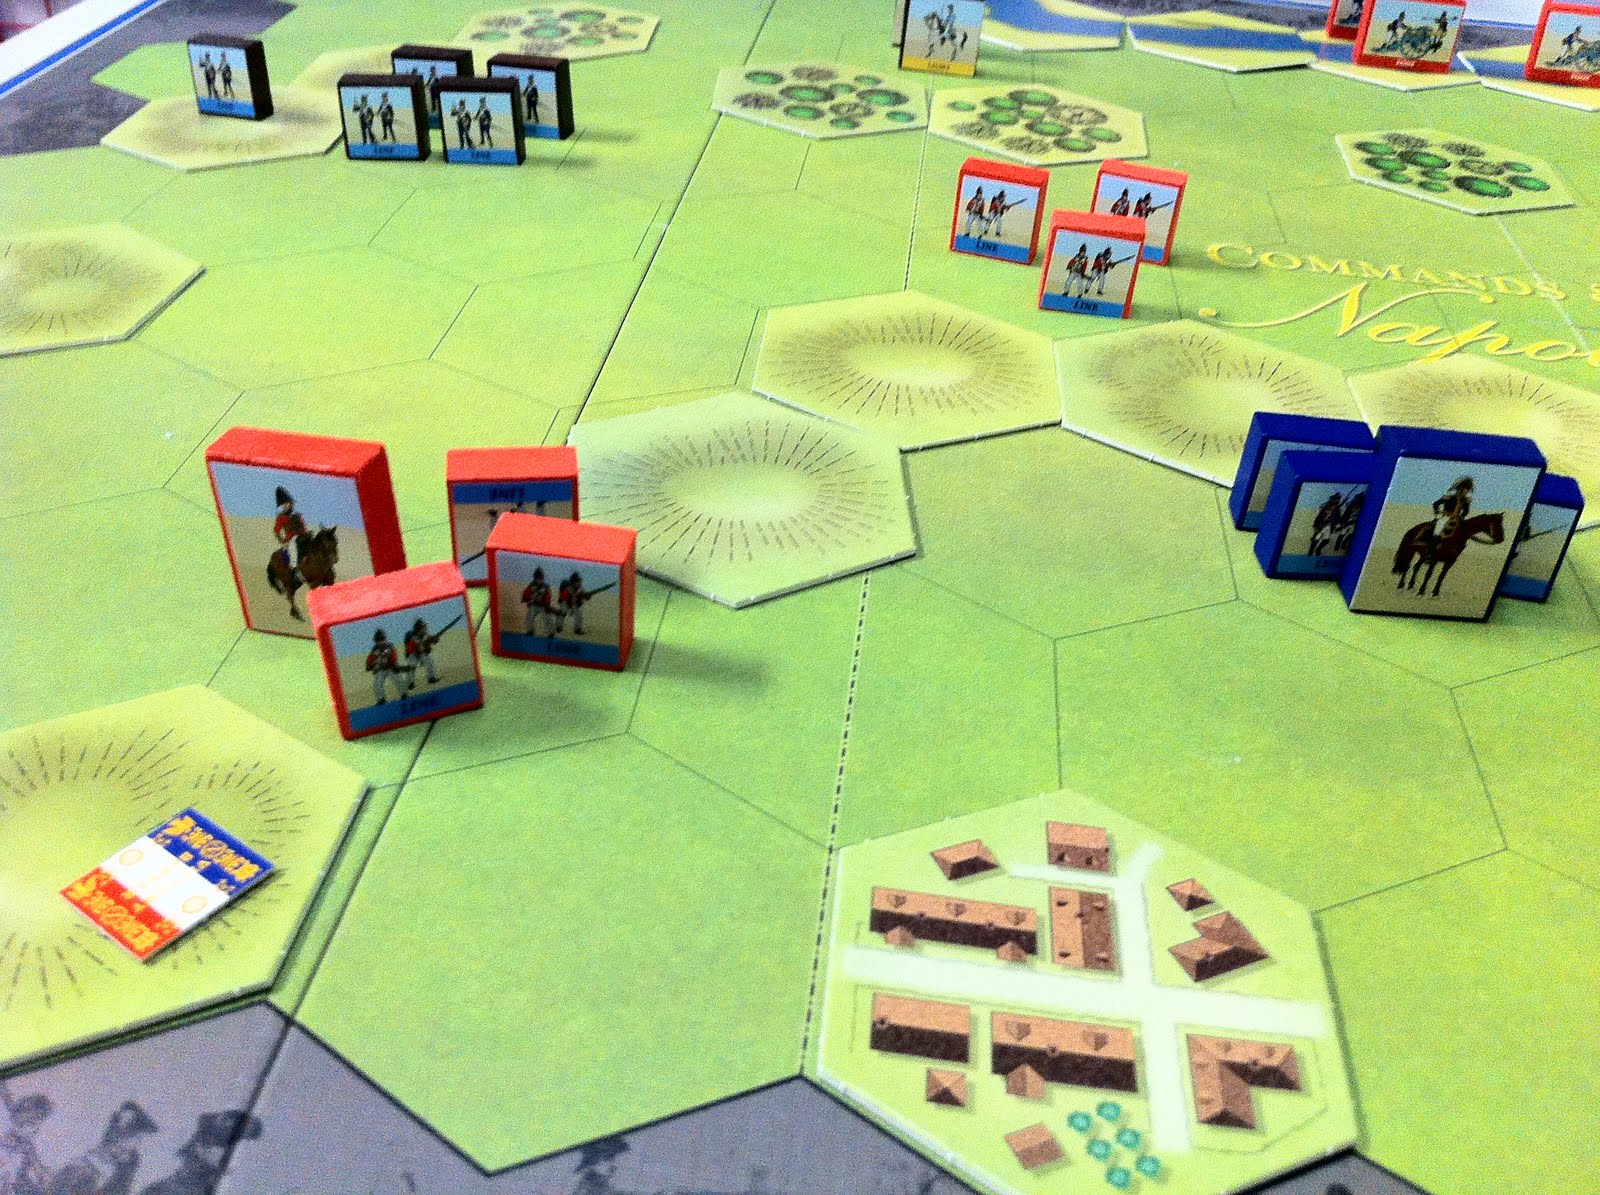
Wellesley leads a dash for an objective flag. He'll get it, but won't stay long. In the end he emerged victorious without it. Photo courtesy Glen Cote
With the help of Glen Cote I got the eagerly anticipated opportunity to break in the new Commands & Colors: Napoleonics from GMT today and was not disappointed. It's definitely a great game.
It's the most involved game in Borg's series, although not by much. It reminds me most of Commands & Colors: Ancients in that there are a lot of subtle unit differences to consider and use of the player aid chart will be constant during the early going. But I expect fans will play this one enough that they'll internalize the numbers before long.
We played matches of the first two scenarios in the scenario book, two battles based on the morning and afternoon actions at Rolica in 1808 -- a total of four games in less than 4 hours!
We were aided in this by the fact that the OBs in the two scenarios are nearly identical so the only thing we had to chance was the terrain.

The morning battle depicts Sir Arthur Wellesley ( the future Duke of Wellington) advancing on a smaller French force that is attempting to delay him. In the historical fight the French fell back after being outflanked. In our first game with me as the French I jumped out to an early 4-0 lead in the race for five flags due in large art to a British bayonet charge against the French left flank that was met disaster as it failed to do much damage and was followed by a French bayonet charge in return that destroyed most of the British and Portuguese attackers. Glen was able to roar back, however, scoring five consecutive flags to seize victory from the jaws of defeat.
When we switched sides my Wellesley led a breakthrough in the same sector where Glen's had come to grief, making it all the way to the French left flank objective hex for the 4th flag! Glen removed that threat by the well-timed play of a Short Supply card that sent Wellesley and his accompanying infantry back to the base line for more bullets. This ended up just postponing the end, however,a s the British were able to get the 4th and 5th flags in other sectors for a 5-3 win.
So the British won twice.
 Next we tried the afternoon battle, where Wellesley attacked a new French position through a series of gullies that channeled and restricted the attack. Historically British elan carried the day, but elan fell short for our British twice. In the first game I had the British (I was already on that side of the board from the last game). I tried to move up my guns but Glen's French were aggressive and came off the ridge line to attack the British spearheads in detail. At the end of the day the French were able to get to their 5 flags while only losing 2 or 3 to the British. When we switched sides it was much the same story except the French were even more fortunate in their combat effectiveness as Glen decided to forgo gunnery and rely on cold steel to carry the heights. Once again the French aggressively moved forward and the end was even more lopsided this time, with a 5-1 win for the French. Two French wins in that scenario, which does look tough for the British, frankly.
Considering the essential simplicity of the game system it managed to capture the feel of Napoleonic warfare very well. In particular there were a lot of cases of back-and-forth exchanges of key terrain positions such as ridges and villages. The rules for forming square work in an interesting manner that definitely involve some interesting choices, especially for lower-quality armies, because each square that is formed take a command card out of action for the duration of the square and reduces the hand of command cards by one.
It was an excellent introduction to the system and I can hardly wait for more.
Tuesday, December 7, 2010
Routing Jackson in West Virginia

At Game Store Tony's request we have started a series refighting the battles of the American Civil War in roughly chronological order using the new Battle Cry game system, Our first battle was the little-known action on July 2, 1861 at Falling Waters, W.V.
It's well-known that the first major battle of the Civil War was fought at First Bull Run later in July, but apparently there was some fighting before that, including this battle where Thomas Jackson (not yet "Stonewall") attempted to delay a federal advance. It was basically two Union brigades against Jackson's one brigade, although the Rebel force also included the cavalry regiment led by the also-soon-to-be-famous Jeb Stuart.
Unlike the historical action, however, Tony's rebels were decidedly disliked by the dice, which didn't match well with his aggressive approach to the scenario. Before long Stuart found himself cavalry-less and was reduced to leading some of Jackson's infantry. Even the appearance of another artillery unit as reinforcements was unable to stem the blue tide and the fedearls ran up an early 4-1 lead in flags. The Rebs battled back with two more flags as the Union closed to try to finish the gray fellows off and eventually the deed was done for a 5-3 USA win.
Tony managed to get some revenge later, however, as his French narrowly edged my Germans 6-5 medals in the Battle of Hannut-Merdorp scenario from Memoir '44. This wasn't a very remarkable fight really. It was mostly a back-and-forth melee between two evenly matched forces amidst a scattering of villages and woods.
Sunday, December 5, 2010
And the stickering is complete
Now to move on to playing!
First, though, let me provide a quick out-of-the-box review. This game is very comparable in presentation with the latest versions of Commands & Colors: Ancients. It comes in the patented GMT "armored box" that should stand up to wargame handling for years with reasonable care. It has a mounted mapboard, as has become the practice for GMT's bigger-selling games of late.
There are, of course, plenty of blocks and stickers of the usual high quality. Not much to say about those expect that it is a time-consuming task to apply them all and a bit frustrating for the clumsy like me. The terain tiles are also similar to what we've seen in CCA.
There is a profusely illustrated full color rule book and a likewise color scenario book with 15 scenarios. I felt this was a little on the light side. I would have liked to see a couple more battles but I'm sure future expansions will get the CCN count up into the triple digits like Memoir '44 and CCA soon enough.
The dice are basically the same quality as the ones in CCA and also require the application of stickers.
There are also four player aid cards with national and unit characteristics as well a a couple of cardboard displays for units that are in square. Not sure yet how that will work. This is a new mechanic in the Borg universe.
Finally there are the command cards. These are high-quality stiff glossy cards similar to the latest versions included in CCA. There is one rather embarrassing typo on one card -- the "Give Them The Cold Steal" card which, of course, should be Steel.
Overall I had a good first impression and I can hardly wait to get this on the table.
Friday, December 3, 2010
Commands & Colors: Napoleonics arrives -- let the stickering begin!
I'll give GMT credit, once they make the game available they don't make you wait for it.
This is in contrast to Days of Wonder, which made me watch the agonizing progress of my order of Memoir '44/Samll World expansions across the country via FedEx ground, I'm not sure it was doing me a favor. It sat in Connecticut for about three days. I think FedEx deliberately holds onto stuff so it doesn't arrive before its scheduled delivery time.
In any case, GMT e-mailed me that my CCN was shipped and bang! There is was on my doorstep.
It will take me longer to apply all the sticers than it took to ship it!
With a week of vacation ahead I hope to get in a session or two.
Thursday, December 2, 2010
Comparative replay session of Battle Cry versions -- 2000 and 2010

Budding wargamer Game Store Tony was up for a double header of Battle Cry at the shop using both the classic original Battle Cry and the new 150th Anniversary Edition of the game to play the same scenario as a comparative exercise.
I selected the First Bull Run scenario, which is the first in each edition's scenario book. Game Store Tony prefers to play the side he perceives as the underdog, which in this case was the South because they lost the war. Of course the CSA did win this particular battle ... .
I selected the First Bull Run scenario, which is the first in each edition's scenario book. Game Store Tony prefers to play the side he perceives as the underdog, which in this case was the South because they lost the war. Of course the CSA did win this particular battle ... .

2000 edition scenario set up for First Bull Run
In any case, we played the classic edition first. Game Store Tony had played Battle Cry before as well as a number of sessions of Memoir '44, so has experience. As an experienced Magic: The Gathering player he's also pretty good at hand management, which is a useful skill in card-based warames such as the Borg designs.
Tony's dice were also pretty hot along with his card draws, so he was able to jump out to an early lead in the flag count. Basically he smashed each Federal attempt to close on him. It was pretty grim. One of the flaws in the older game soon came into play as I had a Bombard card but my sole artillery unit was already gone, rendering the card useless -- a serious problem with just a 4-card hand. Left, center and right the Union side was decimated and the final score was 6-2 for the CSA.
For the rematch I explained the changes in the rules that applied to the scenario at hand.
Among them was that infantry units entering woods now have a limited ability to enter and still battle -- in the older version a unit that enters a woods cannot battle.
The new game adds a new kind of building hex called a "homestead." It provides less protection (-1 die) than the old game's -2 buildings (which are now "town" hexes in BC150) but infantry and cavalry that enter can still battle out at a penalty.
There are some significant differences with generals, who no longer add one die to attacking units they are attached to, but instead allow those units to ignore a flag and also "take ground" under some circumctances. Players of other Borg games such as Memoir '44, Commands & Colors: Ancients and BattleLore have seen these before, but it'sa new addition to the Battle Cry system.
The new Battle Cry also adds a new card called a "Fight Back" card which allows something similar to the "Battle back" function seen in C&C:A and BattleLore.
There have been changes to some other cards as well, with two of the most notable being the addition of the option of using a card you can't otherwise use (such as Bombard when you have no artillery) to order a single unit of any type instead and the disappearance of the overpowered All-Out Offensive card. In it's place is the Battle Cry card, which allows the player to roll dice equal to his command level -- ordering units that match the dice symbols. All of these are familiar to players of the other games in the series. Battle Cry, being the first game, lacked some of the refinements introduced in subsequent designs. These changes bring Battle Cry up to the current standard.

2010 edition scenario
Armed with these new rules we played the First Bull Run scenario from the new edition. Interestingly enough, the biggest changes in the game came from changes in the scenario design, rather than rules and card changes. The revised scenario adds an infantry unit to the CSA side and makes a minor position shift of the two infantry on the Confederate Right. It also ups the CSA card hand from 5 to 6. More signifcantly it also increases the USA hand from 4 to 6 and as the Union player I definitely preferred getting an extra card and having card parity over having one more unit.
In this case the outcome was even more one-sided, but the other way. Aided by good dice and useful cards the Union army was able to smash in both flanks of the CSA. Down 5-1 Game Store Tony decided to go out like a true Rebel and used an Assault in the Center to make a final charge with his survivors. They knocked off a couple more boys in blue and forced a retreat or two, but a Federal Counterattack card meant I had several opportunities to get that last flag. As it turned out, the first Union battle was enough and the game ended 6-1.
Overall I think the rules changes represent common-sense enhancements that bring Battle Cry in line with the state-of-the-art of the other Borg designs. It's still the most straightforward and easiest of the line and is an excellent introduction to the system. It's also a very handsome package, with all components upgraded, brand-new sculpts and new art throughout. The cards are sturdier than the original edition and the dice now have the special symbols printed on them instead of the player having to apply stickers. You still have to sticker the flags, though, which is a challenge for fumble fingers like me,
It's a great package.
Wednesday, December 1, 2010
They're coming fast and furious now. Commands and Colorss Napeolonic has shipped, Battle Cry out of the box
Heard from GMT that my order is on the way and I picked up the new Battle Cry today. Initial out-of-the-box impression is happy. Overall across the board component upgrade and some interesting changes in gameplay revealed by a glance through the rules. I hope to get a game in tomorrow for a test drive.
Monday, November 29, 2010
"Golden Age" blog post is harsh on Memoir '44
This interesting blog post maintains that today is the "Golden Age" of wargaming.
I generally agree with the blog -- and I think his criticisms of Memoir '44 are mostly valid. I just think its flaws bother me less.
To me games like the various Borg designs, Larry Harris' Axis & Allies board games and the Hasbro Axis & Allies land and naval minis, Wings of War, Worthington Games' Hold the Line series and so on fill a needed and valuable niche in the wargaming universe. I don't need any one wargame to be the "ultimate" wargame. There's a need for many different approaches.
To me these lighter wargames are much like a good painting, a television documentary or a comic book. They provide a vivid evocation of a topic, perhaps and insight or two, and with luck prompt a desire to learn more. Their constrained realism is not a bug, but a feature that, if well done, makes a topic accessible to a wider audience. They are no substitute for a detailed study, a book or a library.
Ideally when your new gaming partner starts to point out the unreality, compromises and general silliness that can crop up in a Memoir '44 or Axis & Allies game he/she is ready to move up to the next level. "Yeah, I agree that strategy wouldn't be possible in real life. Maybe you'd like to take a look at _________" and see how it turns out." Many people find all the strategy they want or can handle in a game of M44 or A&A. Indeed, for many people that desire is well-sated by Risk! But for those who are looking for more I think games like Memoir '44 are an excellent introduction. They're fun, colorful and quick and much more successful than SPI/AH era attempts to do the same thing.
Sunday, November 28, 2010
Historical scenarios shared in Gunslinger and Cowboys
Avalon Hill's super-detailed Gunslinger and Worthington's Cowboys: The Way of the Gun cover much the same ground, both being skirmish-level wargames depicting Old West gunfights. Cowboys is the newer and more streamlined design. It's primarily designed as a two-player game with each player able to handle up to a dozen cowboys and town folk, while Gunslinger depicts the action in painstaking and loving detail to the point where it plays best as multi-player game with each player controlling the actions of a single individual or two.
Both include a number of historical scenarios and even include many of the same fights.
Here's brief rundown of the scenarios in Cowboys and and the equivalent scenario is Gunslinger:
Scenario 3 : Shootout at the OK Corral covers the same incident as Gunslinger Variant Showdown One Gunfight at the O.K. Corral. Probably the most famous single gunfight of the Old West, the showdown between the Earps/Doc Holliday and the Mclaurys/Clantons in Tombstone Arizona on Oct. 26, 1881, is a straightforward close-range slugfest.
In Gunslinger the action happens within the confines of the corral on Map A, while in Cowboys it's on the open-terrain on Board K, but there's no practical difference as the corral terrain is unlikely to come into play with both groups of gunfighters set up facing each other at close range in the open.
The Gunslinger Scenario has Wyatt, Virgil and Moragn Earp with Doc Holliday facing Frank and Tom McLaury and Billy Clanton. The Cowboys scenario adds an unarmed Ike Clanton. In both games everyone (except Ike C.) is armed with pistols except for Doc Holliday who has a shotgun. In both scenarios there's also an unpossessed rifle available nearby. The characters used in the Gunslinger scenario for Doc Holliday (Gambler) and Wyatt Earp (Dude) are the best while the Cowboys scenario makes Doc H. and Morgan Earp the best on that side. Frank McLaury is the best character on that side in Gunslinger while Cowboys makes Billy Clanton the top guy among that gang. Gunslinger is more "historical" giving the Earps the advantage of starting "alerted" where in the cowboys scenario both sides have an equal chance of shooting first.
Scenario 4: "You're My Huckleberry" is depicted by one of the small versions of Showdown 1: Gunfight in Gunslinger, a face-off between Doc Holliday and Johnny Ringo on July 13, 1882. This is probably the simplest scenario in both games, with a single gunfighter one each side facing his opponent at close range in the open with holstered pistols. Both use the most open maps (A in Gunslinger and K in Cowboys).
Scenario 6: Commodore Owens vs. The Blevins Boys is the same incident as the small version of Gunslinger Showdown 25: Robber's Roost as Sheriff Commodore Perry Owens tangles with some horse thieves. Oddly enough, the Gunslinger scenario is much more expansive -- using all 8 mapboards -- than the Cowboys version which takes place on just one. But in both cases the focus of the action is a small clutch of buildings and a corral where the four thieves are set up as theya re surprised by Sheriff Owens. In both games Owens is a high-powered guy (+2 in Cowboys and the Marshal +3 in Gunslinger) who is well-armed with a rifle and two pistols but the Gunslinger scenario makes the thieves better armed with some long arms while the Cowboys bad guys just have pistols. The scenario victory conditions are different as well. In Gunslinger the thieves are trying to escape -- any left on the map at game end are captured whereas in Cowboys the thieves must eliminate the sheriff and he has to eliminate one particular horse thief to win, with mutual failure by Turn 15 being a draw.
Scenario 9: The Ambush of Wyatt Earp at Mescal Springs is small version 2 of Showdown 16: Bushwacking from Gunslinger. Both depict the ambush of Wyatt Earp and his companions at Mescal Springs Ariz. on March 24, 1882. There are considerable differences between the two, however. The Gunslinger scenario map set up shows the ambush happening near a stable with other buildings nearby while the Cowboys scenario happens in open country from a rocky area. The Gunslinger scenario shows just Wyatt Earp and his brother Morgan alone facing three Bshwackers while the Cowboys scenario adds Doc Holliday, Warren Earp, Sherm McMasters and Jack Johnson to Wyatt's party while leaving out Morgan. The ambushers number five in the Cowboys version. In the Gunslinger scenario both sides are armed with an assortment of long arms while the Cowboys battle includes only pistols except for Wyatt Earp, who also has a shotgun. Finally, the Cowboys scenario includes a special rule that has combatants fleeing the fight based on a die roll.
Scenario 21: The Dalton Gang's Last Ride depicts the infamous Oct. 9, 1892, Coffeyville, Kansas, Raid, also shown in part in Showdown 9: Bank Robbery in Gunslinger. Both games show the main street of an Old West town, using 8 maps for Gunslinger and five for Cowboys. The tightly focused nature of Gunslinger works against that game here as its forced to focus on the action at just one bank with two members of the Dalton Gang facing five townsfolk. In contrast the Cowboys scenario shows five Dalton gangsters robbing both banks facing the sheriff and four townsfolk with more showing up each turn. In both games the robbers are trying to escape but Gunslinger adds a colorful touch with money bags in the bank.
Scenario 22: Buckshot vs. The Regulators is the same as Gunslinger Variant Showdown 20: The Regulators. Both show Buckshot Rogers alone facing a posse of Regulators (six in Gunslinger and eight in Cowboys) at Blazers Mill, N.M. on April 4, 1878. Both maps feature scattered buildings separated by considerable open space (eight in Gunslinger and six in Cowboys). The posse's target is set up in a building while the Regulators have to try to cross the open ground to get to him. In the Cowboys scenario casualties may caise the other posse members to lose heart and flee, which is an interesting touch.
Scenario 25: Billy's Escape depicts the same July 19, 1878 incident in Lincoln County, N,M, as Gunslinger Showdown 20: Lincoln County War. Billy the Kid is trapped in a burning building, surrounded by enemies, and has to escape. The Gunslinger map is the same setup used for the Regulators scenario, showing a large farmhouse surrounded by outbuildings and countryside. The Cowboys map shows another town setup, using six maps. The Gunslinger scenario includes extensive special rules for darkness falling and the house burning, while Cowboys dispenses with all that and simply requires Billy or two other Regulators to get off the map. The limits of Gunslinger forces it to show a "simplified version of the incidents" with Billy the Kid and one compatriots facing off against five opponents. The Cowboys version shows Billy with four Regulator cowboys and two "townsfolk" against five cowboys and three townsfolk.
Overall, with the exception of Scenario 9, the scenarios shared between the two games are similar enough to clearly represent the same incident while showing some interpretive differences and highlighting the strengths and weaknesses of each game system. Gunslinger's forte is detail and intimacy, which serves it well for tight close-quarter fights like the OK Corral which can be interesting, but force it to compromise when depicting a large event sch as the Coffeyville Raid or Billy the Kid's stand. In contrast Cowboys is a little too streamlined to do OK Corral justice while allowing the whole of something like the Dalton Gang 2-bank heist to be shown.
I'm surprised there isn't more overlap between the two games, as each has several other historical incidents included among its scenarios. It's also worth noting that both games seem to include a scenario inspired by the movie High Noon. In Gunslinger it's rather obviously also called Showdown 23: High Noon, while Cowboys similar treatment is Scenario 15: Gunnin' for the Sheriff. In both a single lawman opposes four outlaws, although the Gunslinger scenario adds some colorful touches with "reinforcements" for the Sheriff comprising a "Lady" and a "Running Boy."
Friday, November 26, 2010
A sad little affair -- Session report for M'44 Gallabat-Metemma
Celebrated the day after Thanksgiving and the 70tg anniversary of the East African campaign with a game of Memoir '44 at the local game shop with the stalwart Game Store Tony.
The scenario was Gallabat-Metemma from the Air Pack, which depicts an action from the opening statges of the British campaign to conquer Italian East Africa -- a campaign they won, but not without suffering a setback here and there. Among those setbacks was this battle and history repeated itself in outline, although not in detail.
It doesn't take long to get to four medals in Memoir '44 for I expected this would be a sharp little action and so it proved. While the British attack on the left side of the river went well enough, taking one hex of Gallabat Fort and eliminating a unit while losing a unit in return, the other side of the river was a disaster for the British.
Things got off to a good start as the air lane once again proved to be pretty disappointing. The Me-109 (representing an Italian CR42) took off, made a strafing run that killed one figure and was promptly shot down during the air check for a medal. That was the last thing that went well for the British on that flank, however, as the three British infantry units on that side immolated themselves on the wire under withering Italian fire (damn good dice) and the battle came to a quick close with a 4-2 Italian victory.
So far I have NOT been impressed with the utility of aircraft in Memoir '44. Like Battlelore's creatures and C&C: Ancients' elephants they seem to be difficult to use and pretty fragile in practice. So far I feel like they're more of a distraction than a game-winner.
Thursday, November 25, 2010
Wartime Thanksgivings
While we enjoy Thanksgiving at home with friends and family it's appropriate to remember our soldiers, sailors, airmen, Marines and others serving overseas and dining on MREs or less at cold outposts in Afghan mountains, at sea or inside missile silos and all the other places where duty requires.
THANKSGIVING DAY 1863
By the President of the United States : a Proclamation
THANKSGIVING DAY 1863
By the President of the United States : a Proclamation
...In the midst of a civil war of unequaled magnitude and severity, which has sometimes seemed to foreign states to invite and to provoke their aggression, peace has been preserved with all nations, order has been maintained, the laws have been respected and obeyed, and harmony has prevailed everywhere, except in the theater of military conflict, while that theater has been greatly contracted by the advancing armies and navies of the Union...
...I do therefore invite my fellow-citizens in every part of the United States, and also those who are at sea and those who are sojourning in foreign lands, to set apart and observe the last Thursday of November next as a day of thanksgiving and praise to our beneficent Father who dwelleth in the heavens.
ABRAHAM LINCOLN
SOURCE: Pilgrim Hall Museum website, which lists a sample of wartime proclamations from 1898, 1917, 1943, 1953, 1967 and 1991.Wednesday, November 24, 2010
Four-day Axis & Allies Global 1940 knock-down, drag-out marathon
Wow.
Well, the redoubtable Game Store Tony and I started a game of Axis & Allies Global 1940 (the combined A&A Europe 1940 and A&A Pacific 1940 mega game) on Saturday, continued Sunday, continued again Tuesday and finally called it on Turn 9 on Wednesday.
I'm definitely more comfortable with the naval/air powers such as the USA, Britain or Japan than I am with the land powers like Soviet Russia and the Germans.
I played the Axis, so I controlled the Germans, Italians and Japanese while Tony had all the Allies.
I wanted to make sure the Germans did the necessary deed that didn't happen in the last two games I played and I ensured the France fell on Turn 1. Unfortunately I couldn't turn that success into an effective campaign against Russia and I spent the balance of the game in a rough stalemate in the East. I made it partway into Russia but by game end the Soviets were pushing pack and Poland and fallen.
Tony's British did a good job on keeping pressure on Germany's Atlantic front, including invasions of Norway, Holland and Normandy that sometimes were pushed back but ultimately were able to stay ashore once the US arrived to help.
Meanwhile Italy ran rampant throughout the Med and Africa and even made forays as far as southern Russia, Iran and off Madagascar. It was all great fun, but the Allies eventually recovered (that factory in South Africa is a big help to the Allies) and retook most of sub-Saharan Africa. After a seesaw struggle that saw Gibraltar change hands at least five times the Americans sank the Italian navy and made landing attempts at both Southern Italy and Southern France that didn't succeed, but were costly for both sides. The German air forces wiped out some significant U.S. and British naval task forces, but the overall trend was inexorably in the favor of the Allies. While we felt that the Allies were not in a position to take the victory cities needed to win by Turn 11 (which would meet the criteria of the 'America +8' variant that's been suggested) we also felt that eventually they would be able to get them.
The story was somewhat different in the Pacific, where Japan was able to achieve a clear edge in the naval war, eliminating the British and ANZAC fleets and chopping the US down to size. We used the "Alpha Setup" which cuts down the number of aircraft by about half for all sides and makes tweaks to the setup. Hawaii, The Philippines and the Dutch East Indian colonies all fell. The Japanese invaded Australia but were not in a position to really follow up their success so the Australians were able to eventually liberate their own territory. It's very difficult to take out a player country unless you take the capital early. The ability to build new troops right at the scene of action helps a defender a lot.
On the other hand the Chinese were able to liberate almost their entire homeland with British help. Things were somewhat in doubt in the Pacific as it looked like it would be very hard for the Allies to rebuild their naval power in the face of Japanese sea superiority, but it would be equally hard for the Japanese to make a return to mainland Asia given the vast hordes of Chinese and British eastern forces. The probable outcome was a stalemate until a decision was reached on the European board.
This was the first game where we used the R&D rules, with the slight modification that you kept your R&D dice after a failed roll and could keep rolling until some success was found. The Italian investment in a couple of R&D dice was a waste as they never came up and the German investment in three R&D dice was a disappointment as well, gaining "radar" which improves the AA guns. As the Allies never tried a strategic bombing raid this had no game effect.
The Japanese and US investments, in contrast, paid off handsomely. A total of 3 dice bought three breakthroughs! While the US "rockets" never came into play the "Jets" were very helpful to the US, basically making Tac Bombers obsolete for them and playing a big role in several battles. Meanwhile the Japanese got "Improved Shipyards" which aided their achievement of naval superiority considerably.
Overall it was a great experience, although rather exhausting for both players. Because there was no "down time" for each player while others were moving we found that the game moved more slowly than it does with multiple players.
We're going to shoot for another Global 1940 come January.
Tuesday, November 23, 2010
Battle Cry release delayed a little bit -- hopefully
According to Hasbro it will now be out Nov. 30.
Friday, November 19, 2010
King Philip's War review
King Philip's War, an offering of Multi-man Publishing's International Games Series line is at once both a fairly ordinary cardboard chit wargame and an unusual, even extraordinary, game.
The ordinary aspect of the game is that it's a relatively low complexity, point-to-point, CRT-based wargame that uses cardboard counters and markers (154 of them), has one standard-sized map, two double-sided player aid cards, one 20-page rule book, two standard D^ and one special Event die. The MSRP is $44, so it's not exactly a bargain, although it's still in the mainstream of current wargame pricing. System-wise it doesn't really break any new ground, although there are some neat twists here and there.
The extraordinary part is the amount of attention the game received before publication and its potential to popularize a truly little-know, but important, part of American History.
King Philips' War was fought in 1675 to 1676 in southern New England in the area now occupied by the states of Massachusetts, Connecticut and Rhode Island. Those three states were then colonies, with that part of modern Massachusetts that comprises Plymouth and Bristol counties and Cape Cod and the islands being the separate Plymouth Colony. I think it's safe to say that for most Americans the era between the Pilgrims stepping ashore at Plymouth and Paul Revere's ride are a blur, often covered in an afternoon in high school history courses. Growing up in Massachusetts I was exposed to more about the colonial period, but for us it was local history.
King Philip was the sachem (overall chief) of the Wampanoag Indian tribe, which lived in Southeastern New England and had had the longest and most intimate contact with the English. By 1675 the English had already been in the region for more than half a century. Despite that long contact relations between the native population and the newcomers were not smooth. While a substantial number of Indians had adopted Christianity and English ways (the so-called "Praying Indians") the majority still lived in the traditional style and considered themselves very separate people from the English. The colonists, on the other hand, seemed to regard the Indians as part of their community in some way, and not wholly separate.
Peace was mainained between the English and Indians so long as Massasoit, who was the grand sachem when the Pilgrims arrived, lived. And fortunately for the English, Massasoit lived to a ripe old age, dying in his 80s. His eldest son, Wamsutta, took over, but he died within a year, which elevated his brother Metacom, known to the English as Philip, to be sachem. The circumstances of Wamsutta's death were murky, and it appears that Philip believed that Wamsutta had been murdered. War didn't break out immediately, however, but over the next dozen years tensions rose. The final straw was the English arrest and punishment of two Indians for the murder of another Indian, which Philip regarded as a purely Indian affair. War broke out soon after.
King Philip's War was proportionately the bloodiest war in American history. While exact numbers are not available, it appears that about 1.5% of the 52.000 English colonists lost their lives and property destruction was immense. The Indians suffered even more heavily, with at least 15% of the 20,000 Indians in the involved tribes being killed and the tribal social structure being largely destroyed. Many of the surviving Indians were sold off into slavery.
It was the one chance, however, that the native people ever had to inflict a strategic defeat on the Europeans. The odds would never again be as close.
Fighting the war required the colonies to cooperate, laying the groundwork for colonial cooperation in later generations and also starting to forge an identity as Americans. The English colonist were completely on their own, getting no help from England during the war. It was fought entirely with local resources.
That there are still raw feelings about this conflict, despite the passage of more than three centuries, was revealed when an article in a Rhode Island newspaper stirred up a minor firestorm when it reported that a game about the war was being designed.
As a journalist myself, I have to say that I didn't find this story an example of good journalism. The reporter apparently contacted some tribal leaders (yes, the descendants of the tribes still live in the region) and asked them for comments. It's hard to know exactly what was said to the tribal leaders about the game. It's highly likely that they were completely unfamiliar with the concept of hobby wargames or that many other conflicts past, present and future have been depicted by them, so it's natural that they had a negative reaction upon being told that someone was making a game about the biggest tragedy in their history. They protested, they criticized and they demanded that the game be dropped. Attempts by the designer, John Poniske, to reach out to tribal officials were rebuffed. To his credit, and he credit of MMP, the project went ahead. In his designer's notes he says "The purpose for this game simulation has never changed: it has always been my hope to increase knowledge and interest in this little-know, but highly influential, chapter of our country's history."
And to do that, the game will have to be played. Fortunately Mr. Poniske has designed a very playable and enjoyable little game that provides and interesting game experience and should see better-than-average table time for a wargame.
First off, it must be said that this is not a definitive, highly detailed simulation of all aspects of the war. I'm not sure there's information available to go into great detail and it's probably too risky to try it on such an obscure topic.
Instead KPW concentrates on the big picture of overall war strategy and maneuver, with questions of diplomacy, logistics and internal politics sketchily covered and the most tragic elements inferred.
The map depicts the colonies of Massachusetts Bay, Plymouth Colony, Rhode Island and Connecticut. Strewn throughout the colonies are spacces representing English settlements (red circle with a colored band for each colony) Indian villages (white circles with color bands for each tribe) and neutral spaces. linking the spaces are paths with 1, 2 or 3 "pips" that indicate the movement point cost for using that path. Normally Indian units have 6 movement points available, while the English normally have 5. Some spacesa re also linked by rivers which the Indians can always use and the English can use under special circumstances. River movement is speedy, costing just half a movement point per space.
The sequence of play is straightforward, beginning with several phases that may add new troops, followed by Indian movement and combat and then English movement and combat.
The mainstay for each side are counters depicting small groups of warriors (Indians) and soldiers (English) worth 2 Strength Points (SP) each at full strength and 1 SP when reduced. Each side's villages (Indian) and settlements (English) have an inherent defense of 1 SP, while the two forts on each side have a strength of 2. There are two "key leaders" on each side who also have a strength of 1, and the Indians have some musket counters that give a 1 SP bonus to the warrior carrying it.
Combat is conducted by rolling three dice, 1 green D6 for the Indians and one red D6 for the English and a special Event die, which I'll discuss in a moment. Generally the D^ roll for each side is cross referenced on the CRT with the number of SP in the respective force to determine a result expressed in SPs lost. For example, a full strength Indian warband with a musket (3SP) attacking an undefended English settlement will miss entirely on a 1 or 2, will cause 1 hit on a 3-5 and 2 hits on a 6. In return, the English settlement, with it's inherent 1SP, will miss on a 1-4 and inflict 1 SP loss on a 5 or 6. The first SP loss on the settlement permanently eliminates the garrison and it's marked with a "raided" counter. If another hit is inflicted then the settlement is "razed" and considered completely destroyed for all game purposes and awards a victory point tot he Indians. The English can do the same to Indian villages. Victory points are also scored for eliminating units and leaders.
The twist in the combat system is that third die, which is an "Event" die. To determine which player is affected by the die, you total the red adn green dice. If the total is odd, then the Indians are affected, even it's the British. If there's a tie then there's no battle at all (due to bad weather, getting lost, etc.).
Three of the results Panic, Ambush and Emergency Reinforcements aid one side or the other in the current battle, while the other three (spy, guide, massacre) potentially add counters for later use to one side.
Leaders are vital for both sides. Without a leader only two combat units can occupy the same space. A leader can stack up to three combat units, aids in evading combat and intercepting enemy units. Leaders can have guides attached to them to speed their movement and can have spys attached that hinder their movement. Each of the English colonies has one "captain" to lead their "companies" (stacks) Each Indian tribe has a sachem to lead their "warband." The Indians have more leaders overall, as there are nine tribes and just four colonies.
Each side also has two "Key Leaders," one at start and one that comes as a reinforcement. Key Leaders have all the powers of other leaders, plus they add one SP to a stack, allow units from different tribes to stack and they often have other special abilities.
For the Indian side the most important leader is King Philip, who starts on the map. Besides leading troops, King Philip can conduct "diplomacy" at the beginning of the turn. Depending upon how many English settlements have been razed, other tribes may join the three Wampanoag tribes in the war. For example, after 2 settlements ahve been razed, the powerful Narragansetts on the Connecticut-Rhode Island border will join if Philip conducts the necessary "diplomacy" to do so, which in game terms is simply picking Philip up from wherever he is and placing him on a village belonging to that tribe. Basically Philip can bring in one new tribe a turn so long as the Indians are burning settlements. On the other hand, if the English burn enough Indian villages then some tribes start surrendering and dropping out of the war.
The Narragansetts bring in the other Key Leader for the Indians, Canonchet, who doesn't have any special powers. The English start with one Key Leader on the map, John Winslow, who like Cononchet doesn't have any special powers other than the general leader/key leader ones.
The other key leader is a literal game changer, Benjamin Church. Historically Church was largely responsible for turning the tide after the initial Indian successes as he employed allied Inidans and used Indian-style tactics to fight the Indians instead of the less-effective European tactics.
In the game Church has a tremendous impact. Before he arrives the English can't use paths that cost more than 1 pip, they can only move three stacks and fight three battles, and they can't use river movement. After he arrives the English can use any path, they can move and fight with five stacks and stacks with Church and Indian Allies can use river moves. Once Church arrives the English can roll to receive Indian allies, which are 2 SP units that can arrive almost anywhere. The Indian movement/combat limit is five stacks all game.
Both sides have the dilemma of more things needing doing than stacks able to do it, so managing resources as well as strategy is vital. The Indian side starts with the initiative and Philip needs to do as much damage as he can to bring in allied tribes before Church arrives and evens things up between the two sides. The standard rule is for Church to enter on a die roll, but this does add a big luck element to the game and there's an optional rule that has Church arrive automatically on Turn 3. I'd recommend this for competitive play.
Both sides are to choose between trying to burn villages and eliminating combat units. Razing settlements/villages is important for tribal recruitment/surrender, a direct source of victory points and they're easier targets than stacks of troops. On the other hand, eliminating the enemy's troops can really crimp their ability to raze YOUR villages and can also generate victory point awards.
Overall victory is determined by accumulated victory points. If either side reaches 30 VP then they win immediately, otherwise whoever has the most VP at the end of Turn 9 is the winner. There are also sudden death victory conditions. If both Philip and Canonchet are eliminated then the Indians lose instantly. If both English forts (Boston and Plymouth) are razed then the Indians win instantly.
With both sides intermixed and evenly matched overall, King Philip's War is a game of opportunism and nerve. There's a pretty high chaos factor between the Event roll, Church entry, CRT results and the 1-in-6 chance a planned battle won't happen at all, so this is definitely not a game for those who hate too much luck. On the other hand it's a wild and woolly ride for players who have the nerve to try it and it should be an entertaining -- and educational -- time, win or lose.
KPW take about 2-3 hours to play, so a two-game match is doable in an evening's gaming. Set up time is minimal.
Thursday, November 18, 2010
More stuff on the way -- this time Days of Wonder
Wow, I wish these guys would spread it out a little more. Now Days of Wonder is charging for some of their newest stuff -- Winter Wars and Disaster at Dieppe for Memoir '44 and Be Not Afraid, Necromancer Island and Be Not Afraid Catapult for Small World.
Wednesday, November 17, 2010

Tuesday, November 16, 2010
Persian Incursion on the way?
 CoA Web page on the game
It appears from my bank account that Clash of Arms has started charging for Persian Incursion, a Harpoon4-series game that looks in detail at the war that neo-cons dearly want to see -- a US and/or Israeli strike on Iran.
This is the sort of speculative wargame that used to be done all the time but seems to have fallen on hard times lately. I'm looking for ward to seeing it.
Monday, November 15, 2010
Ellis Con Axis & Allies Global 1940 session report
Well, I spent all of Ellis Con playing one game, but what a game!
I think the Global 1940 Axis & Allies is a terrific game experience. The scale of the game mitigates some of the things about A&A I didn''t care for in the past -- especially some strange geography and an unfortunate luck factor. These seem much less of a problem with Global.
This was the first game I took part in where everybody had some level of experience with at least the Axis & Allies system and several players had played Global before.
On the Axis side the German player was a fellow who had definitely played A&A before and I think he said he'd played the Global game once. He was joined by a gentleman who played Italy and Japan and had played Global before. While I hadn't met him before, he was well-known to some other participants, who liked to tease him for his "deliberate" (slow) playing style. I worried a bit about this given how big a game Global is, but in the end everyone else seemed to make u for it with speedy play and time-saving steps like figuring out their build ahead of time and some powers moving at the same time as others when they were not affecting each other. We were able to play seven turns, which was enough to reach a decision.
The Italo-Japanese player had brought his teen nephew to the game and he wanted to have fun beating up on uncle so he took the US. While young, he handled his nation very well, as we'll see.
I took the British because I wanted to have a hand in both ends of the board. Our Russian player had played A&A before, but never Global, but he had an excellent appreciation of the fundamentals of Soviet strategy in A&A. Our final player was also experienced in Global and he took the trio of "minor" powers, France, China and the ANZACs, Having an experienced good player for those minor countries ended up playing a big role int the outcome as well.
The game started with in a familiar way, as the German player made the same mistake I made as the German player in my last game -- failing to ensure that France fell on Turn 1. In my case I misjudged the forces I needed, but in this game the German was intent on taking out the British navy and he launched a huge air and sea campaign over the next few turns that saw a lot of drama, including an invasion of Scotland! He did succeed in gutting British naval power, but at the cost of his own and a huge chunk of his air force as well. Scotland was recaptured so no permanent damage was done to the British.
Naturally the Germans had to let someplace else suffer and that place was France. While Normandy fell easily enough, the German attack on France proper -- already a marginal affair -- suffered a huge setback when he failed to roll a single hit in his attack. The French were much luckier and nearly wiped out the German infantry in the attacking force. Unwilling to start taking hits on tanks and Stukas the German called off the attack.
There was some discussion over whether or not to simply reset the game at that point, given the poor German opening, but the Axis players declined. The German player was satisfied with the damage he did to the British fleet and the Italo-Japanese had yet to move so the Axis pressed on. The Italians, when their turn came, joined in the attack on France, taking southern France amphibiously while using their navy to crush the French Navy. The Japanese launched a ground offensive against China, beginning a multi-turn campaign that was well handled by the China player. At this point I should mention that we were using the "Alpha" variant setup for the Pacific board which reduces the air power of all the Pacific countries (which were disproportionate) and makes some other changes, including a beefier Chinese army.
When the French turn came around we started to see some of the effects of a surviving France. The French had money and a chance to build, so they bought a chunk more infantry to make the second German attempt as costly as possible. And the French sent their one fighter to attack the Italy's unguarded merchant fleet of two transports! The Italy player had forgotten that France had a fighter (naturally, since normally France doesn't have one by the time its move comes around). After sinking Italy's merchant fleet the fighter landed in Malta. From there it was destined to be a thorn in Italy's side for the rest of the game when it joined the British forces iN Egypt. The hero French fighter survived the game, as matter of fact!
The failure to capture France put the Germans a turn behind schedule, and the destruction of Italy's merchant fleet likewise put Italy a turn behind schedule in the Med.
To make a long story short, the Italian effort in North Africa was stalemated. By the time they rebuilt their transports and tried to take Egypt it was strongly held. The Italian Turn 3 invasion was crushed (with notable help from the sharpshooting French fighter which killed 2 of the four invaders) and after that the British won the buildup race, shipping aircraft via Gibraltar and from South Africa and eventually joined by troops from Iran and east Africa after Italian East Africa and Iraq were dispatched. When the Americans joined the war they sent some troops into unconquered French Algeria.
Stymied in the Med, the Italians sent substantial ground forces to aid their German ally, who had run into a solid wall of Soviets. As seen in the last game, the 1-turn delay in the German timetable meant that the Russians actually declared war on the Germans first. The delayed German Barbarossa was also critically short on air support, most of the Luftwaffe having been expended against the Royal Navy. The Soviets were able to blunt the German attack and were slowly gaining an edge, thanks in no small part to the large Soviet air force!
Meanwhile in the Pacific, after a few turns of expensive fighting against China the Japanese decided they had better grab the resource-rich Dutch territories while there was still time, so on Turn 3 they moved.
The lack of Japanese pressure, however, meant that the US, Pacific British and ANZACs were able to build up their naval forces and before long the Japanese found themselves in a five-front war! Besides the undefeated Chinese they faced newly aggressive Russians and three navies. When a Japanese naval task force ventured within range the British gladly expended their Pacific navy to take it out. Both fleets were destroyed, leaving a lonely Japanese merchant to be dispatched by a French destroyer! Meanwhile the US eventually brought an overwhelming force to bear against Japan itself -- despite a game attempt by uncle to sucker nephew into a premature attack. Vast navies and air forces (At least five loaded US carriers, three US battleships and other surface ships and a heavy bomber against two Japanese carriers, tow BBs and air units and other ships) clashed over Japan. When it was over there were still three damaged US battleships and two cruisers holding the sea zone and Japan was down to one task force off the coast of China -- and that task force was being stalked by an equal-sized ANZAC task force of a loaded CV, a BB, a CA, a DD and a Heavy bomber within range! The ANZAC player was quite willing to follow the example of his allies and lose his fleet to destroy the last Japanese fleet.
At this point the Axis players admitted defeat. Germany was stalemated on the Russian border, the Italians were about to lose their navy on the next British turn to a strike by 5 heavy bombers, 3 Tacs and four fighters (the British had meanwhile been conducting a strategic bombing campaign against Germany, which has 19 damage on its main industry site. Japan was being pushed back in China and southeast Asia and had lost 3/4 of its fleet. With no good news anywhere it was time to call it.
We started at about 10:30 a.m. and finished at 8:30 p.m. with a half hour lunch break and another half hour or so pause during the auction so total playing time was between 8 and 9 hours.
Sunday, November 14, 2010
Ellis Con worth the trip
Ellis High School is a tech school located off I-395 in Northeastern Conn. which has slowly become the site of one of New England's best little wargame-oriented conventions, sponsored by the high school's Simulation Club.
I don't know what the official count was, but there were well over 100 people taking part in games. Some were euros and simpler style wargames such a sMemoir '44 and Heroscape, but there were also a number of honest-to-goodness real hardcore wargames including some large world War II and modern tactical miniatures wargames, a large Civil War battle using Fire & Fury and a large WWII naval battle using a heavily modified version of the Axis & Allies War at Sea game.
There were also two simultaneous games of Global Axis & Allies, one of which I took part in and I plan to write up a a session report on it tomorrow.
It was, as always, a chance to see some old friend and overall was an excellent way to sepnd a Saturday.
Thursday, November 11, 2010
Commemorating
Today is, of course, Veterans Day in the U.S. (and Remembrance Day in Canada). Now dedicated to the memory of all veterans, it has its roots in Armistice Day, which celebrated the effective end of World War I in 1918. This is the 92nd anniversary of the end of the war, not a particularly noteworthy anniversary as far as those things go, except for the fact that there's a good chance it will be the last one that we get to honor a living veteran of the war.
That's the thing about anniversaries. There are so many things to commemorate that common sense dictates we use some system to keep them to a manageable number. Every day is the XXth anniversary of something or other. I've been making note of a number of 70th anniversary of World War II events, recently. For example it was 70 years ago this week that the initial British campaign into Italian East Africa started. Again, the 70th anniversary of something, while a rounder number than 92, usually isn't one of the milestone markers we note. It's again noteworthy in part because we're losing so many World War II veterans these days and there will be many fewer around even for the 75th in a few years.
There are, however, some pretty noteworthy milestone anniversaries coming up in te next few years. We're nearing the centennial of the start of World War I in just 4 years which will probably bring heightened interest. We've already started seeing events marking the 150th anniversary of the U.S. Civil War, which will definitely be in the news a lot. It's also sobering to recognize that World War II is already much further in OUR past than the Civil War was in the past for World War I participants. We sometimes think that World War I generals were backward in recognizing that warfare had changed a lot from Gettysburg -- but our modern military bears more resemblances to World War II military tech than World War I did to the Civil War, no?
We're also in the middle of the 200th anniversary of the Napoleonic Wars and on the cusp of the related 200th anniversary of the War of 1812. But 200 years seems to be the limit to how far back the popular remembrances are willing to go before disappearing for good into the history books and becoming the concern only of experts and specialists. We just passed the 250th anniversary of some key events of the Seven Years War with, so far as I know, hardly a hint of it in the popular press.
Subscribe to:
Posts (Atom)