Monday, February 20, 2012

Some thoughts on war with Iran illuminated by Persian Incursion

War talk is in the air again, in the wake of a New York Times article this weekend suggesting that Israel may have already decided on making a strike by April.

There's a lot of speculation in the article and on the Internet about whether Israel could pull it off, and the headline of the article even suggests it might be difficult to do.

"Iran Raid Seen as a Huge Task for Israeli Jets"


It says.

Right.

As it turns out, of course, this question has been exhaustively examined in the Clash of Arms wargame Persian Incursion. I had hoped to write up a detailed review and session report based on an online game I had been playing, but real-life interruptions broke up the pace and its unclear whether it will get finished soon or ever. But I did play enough of it to get a good appreciation of the game's ability to address the question: Can Israel do it?

Let me address right off the protest: "But it's only a game!" True, but many experts familiar with both classified military wargames and civilian wargames have said that the military games have little or no advantages in accuracy over thoroughly researched open-source commercial games.

First off, it's important to note that Persian Incursion is really two games in one. The first is a political-diplomatic card game that can be played concurrently or prior to the military game and examines the complex interplay of politics, diplomacy, media, public opinion and other "soft" factors tat are critically important but hard to quantify. This portion of the game is highly subjective and not coincidentally provides the Iranian player with his best chance for successes. This is defensible from areal-world standpoint and, just as importantly, allows the game designer to create a competitive game experience for the Iranian side.

And the hard-data driven military game, which is basically a streamlined version of Larry Bond's super-detailed Harpoon4 game system, shows how necessary this card game option is because the Iranians, plainly have absolutely no chance militarily. Oh, sure, a lucky shot here or there may shoot down an Israeli jet or two or land an occasional missile in a Tel Aviv city block, with the consequent propaganda 'victory' for Iran, but the Iranians have no ability to impede the Israeli raiders in any significant military sense. Whatever the Israelis decide to destroy will be destroyed. The Israeli challenge is almost purely a technical and logistic one caused by the extreme distance and some limited resources. As such, however, it's also one that thorough planning by a highly professional military such as Israel's can be expected to overcome.

What the Israelis won't have to deal with is much of the way of unpredictably effective defensive action by the Iranian military. Their available aircraft and anti-aircraft missiles are several generations behind the Israeli attackers and, for the most part, will likely be completely neutralized. As I said, one can't completely discount a lucky shot, so there's some small risk for an unpleasant (for the Israeli side) incident or two, but losses will be minimal and damage extensive.

For the purposes of making the game competitive and challenging for the players, the game demands that the Israelis completely destroy their targets in order to get full credit towards winning the war. But in reality, all the Israelis have to do is destroy certain critical components of the targeted facilities -- whether nuclear or oil -- to accomplish their aim of delaying Iran's supposed nuclear ambitions. It's clear that they should have little trouble doing that.

In the final analysis, Bond's game suggests strongly that the military success of an Israeli strike is about as sure thing as you're likely to see in the annals of warfare. What the game does not -- and cannot -- answer is whether such a strike would be a political and diplomatic success or a disaster. The card game, however, does imply that's where the biggest danger for the Israelis and, by extension, the US lies.

Saturday, February 18, 2012

Session report for Revised War at Sea WAS-1 scenario

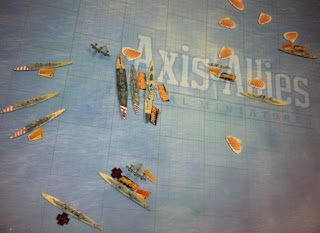
The peak of the action. Map and most of the markers are from Gale Force Nine, while the two red crosses are Litko markers showing that the ship's once-per-game special ability has been used.


Following up on this post, here's a resent session played at Arkham Asylum in Norwich CT. We had four players, so each player took one of the four task forces.

The pre-game die rolls were tough on bost side' destroyer forces. Iachino rolled a '5' and therefore had just two DD's while Campioni rolled a '6' and had just a single DD! The British hardly rolled better, rolling a five and therefore they were down three destroyers!

On the other hand, both sides were pretty fortunate with their reinforcement rolls. The British heavy ships showed up on Turn 3 while the Italian reinforcements arrived on turns 3 and 4. The Swordfish also made frequent appearances, missing just one or two possible turns. The Ark Royal must have been stationed just off the map edge.

The revised scenario seems a little tough for the British to me (as did the original version) but two solitiare playings did result in one British victpory on points, so it hardly seemed hopeless. There are a lot of random variables in the scenario, between destroyer rolls and reinforcement rolls, not to mention the air support rolls. It's also a very large scenario, with four capital ships, 11 cruisers and up to 20 destroyers.

One element that worked against the British was initiative, Despite having only a +1 edge on initiative rolls, the Italians won the initiative all but one time during the game.

Admiral Holland's cruiser force shaded to the north as it advanced, which Iachino's cruisers initially matched. Initial exchanges of fire were fairly even with the Italinas losing a destroyer and the Berwick being crippled and forced to fall back.

Somerville's capital ship/destroyer force soon arrived and started to close, although the Ramillies couldn't seem to make a speed roll (it failed every single one!) an was soon left behind.
Meanwhile Campini's force also arrived on the scene. Taking advantage of their initiative and spped special abilities the Italian cruisers swept south suddenly while the battle line headed straight at the British force. An awful turn of firing saw every single British cruiser miss its shots while the Italians sent two light cruisers t the bottom. This proved to be a major turning point, as it put the Itaians seriously ahead on points. Despite some clever maneuvering and efffective smoke screening by the British destroyers the Italians were able to capitalize on their firepower superiority to continue pounding the British while taking less damage in return.

With the "Limited Opportunity" die roll ending the game on Turn 7 the Italians pulled back to preserve their win. The Renown charged in to boarding range under a hail of Italian fire that left it crippled, but afloat, on the last turn. At point-blank range the Renown clobbered the Guilio Cesare and, with the assist of a DD-fired torpedo, sunk her!

This made the final score somewhat closer than it would have been, with the Italians scoring 112 points and the British 86. The sole survivors on the British side were the cripples Renown, Berwick and a destroyer -- and an unscathed Ramillies. One of the two swordfish also survived.

The Italians were in much better shape. The Vittorio Veneto and two heavy cruisers were undamaged, two cruisers had 1 point of damage and one cruiser was crippled.

While I think the scenario is more challenging for the British, it does appear they have a chance. Bad British luck during the first turn where both cruiser forces were blazing away at each other put them behind the power curve. The British commanders also didn't take advantage of the slight edge they had in reinforcement arrivals to draw the Italian cruisers out of supporting range of the battleships. With the aid of the smoke screening destroyers they could have arranged at least a one-turn firepower advantage. While called light cruisers, the British warships in Holland's task force are comparable in points, firepower and protection to Iachino's cruisers. Holland's task force is worth 63 points, rolls 31 dice at range 3 and all have armor 4 while Iachino's cruisers are worth 85 points, roll a total of 36 dice at range 3 and have armor values of 4 and 5. But add in Renown and the British have another 33 points of ship, with 11 more dice and an armor of 7. It's a fleeting potential edge, however, and in the event the British didn't achieve it.

Overall the revised scenario worked well. It's been suggested that the three Luca Tarigo's in the revised scenario should be replaced with more Ascari's to better reflect the historical OB but in this case so many DDs were removed by the pre-game die rolls that none of the Luca Tarigo's appeared anyway, so it made no difference.

Game ending positions

Wednesday, February 8, 2012

Revised 6-set OB for WAS-1 Action Deferred scenario


Revised 6-set OB for WAS-1 Action Deferred scenario

Changes Bold

Italian

Admiral Campioni’s Task Force

Vittorio Veneto BB

Guillio Cesare BB

Luca Tarigo DD x3 (Freccia, Saetta, Dardo)

Ascari x 4 (Alpini, Granatiere, Fucilieri, Bersagliere)

Italian must split DD lost by scenario special rule evenly with odd number his choice)

Admiral Iachino’s Task Force

Bolzano CA x1

Gorizia CA x 1

Zara CA x 2 (Fiume & Pola)

Trento CA x 2 (also Trieste)

Ascari DD x1

Camicia Nere DD x6 (Carabiniere, Lanciere, Gioberti, Alfiere, Carducci, Oriani)

First 3 DD lost by scenario rule must be Camicia Nere, after that, Italian choice)

British


Admiral Somerville’s Task Force

HMS Repulse BC x 1 (Renown)

HMS Royal Oak BB x 1 (Ramillies)

St. Laurent DD x 5 (Encounter, Faulkner, Firedrake, Forester, Fury)

Vasilissa Olga DD x 4 ( Gallant, Greyhound, Griffin, Hereward)

All Allied DD have Lay Smoke SA; British must split DD lost by scenario special rule evenly with odd number his choice)

Admiral Hollands’ Task Force

HMS Kent CA x1 (Berwick)

HMS Sheffield CL x 3 (also Southampton & Newcastle)

HMS Belfast CL x 1 (Manchester)


British Carrier Support Group

Swordfish Mk. II x 2 (Special rule applies to both squadrons together, i.e. one shootdown or 12 DR affects both units)

Discussion

The official scenarios were published when War at Sea was brand new, as part of the marketing effort, Being so early, they required a crazy amount of proxie and some pretty extreme ones as well. A good example is this scenario, where, as originally published, the American battleship USS Tennessee stood in for the Guillio Casare! I’m not sure how many of these scenarios got played as written anyway because few people would have had the models required, such as FOUR Bolzanos (a rare) or up to 14 Luca Tarigo’s.

I thought it would be interesting to revisit and revise those scenarios now that we have six sets worth of units to choose from In the case of scenario WAS-1, The Battle of Cape Teulada we go from having just one actual ship and a couple of sister ships with all the rest proxies to having no fewer than seven named ships and all the others either sisters or near-sisters with no proxies required at all.

Notes and rationales

Vitttorio Veneto – no change

Guillio Cesare – we now have the actual ship, so it is used.

Luca Tarigo x 3 –can cut down on the number of Luca Tarigo’s now that we have Soldati-class DDs available.

Ascari x 4 – we substitute Ascarisfor the four Soldati-class DDs in Campioni’s task force

Blozano – We only need one now for the actual ship.

Gorizia – actual ship now available

Zara x2 – Two Zaras are used to represent sister ships Fiume and Pola

Trento x 2 – We have the actualship for the Trento and use another one for sister Trieste

Ascari -- we have the actual ship

Camicia Nere x 6 – I think it’s a bad idea to require inordinate numbers of particular model when sister ships are available. Here we substitute a half-dozen Camicia Nere for the other Soldati-class DD’s present. Due to the scenario special rule you’ll always lose at least one DD from each group, so you actually only need four Ascari and five Camicia Nere models in practice.

HMS Repulse – Substitute for sister ship Renown, and as everybody knows, the model is actually the Renown anyway, so we could consider this as having the Actual Ship.

HMS Royal Oak – Substitute for sister ship Ramillies.

St. Laurent x 5 – C class DD substitutes for near sister of the E and F classes)

Vasilissa Olga x 4 (Greek DD substitutes for near sisters of the G and H classes)

I added the Lay Smoke Screen SA as a special rule to keep an important tactic available to the British side that the Javelin DD’s had made possible.

HMS Kent – Substitute for sister ship Berwick

HMS Sheffield x 3 – One is the actual ship, with the other pair representing sisters Southampton and Newcastle.

HMS Belfast – Substitute for sister ship Manchester

Swordfish Mk. II x 2 – I doubled the number of Swordfish to make up for the increased point differential between the two sides cause by the various substitutions and also because the British carrier Ark Royal was the carrier present, not the Illustrious. Optionally you can add the Ark Royal and one more Swordfish to Admiral Somerville’s Task Force and skip the special rule, although I am not sure this helps the British overall.


Friday, February 3, 2012

1942: The Hinge of Fate

We're a month into 2012, and also a month into the 70th anniversary of 1942, probably the pivotal year of the entire war.

In Winston Churchill's epic 6-volume History of the Second World War, Vol. IV was called "The Hinge of Fate." It's also no coincidence that the classic version of the Axis & Allies war game is set in 1942, the moment when everything seemed to hang in the balance.

It's true that the seeds for ultimate victory and defeat were laid earlier -- but they always are, aren't they? But it';s also true that 1942 represented the point at which things could go either way. On the one hand, if the Axis could build on their 1941 successes in Russia, the U-Boat war, North Africa and the Pacific, ultimate victory was was in sight. On the other hand, if the Allies could stem Axis advances, there was every expectation that eventual victory was assured as their superior economic might came more and more into play.

Bataan, Malaya, Coral Sea, Midway, Guadalcanal, Stalingrad, Gazala, El Alamein, Operation Torch -- the year was full of dramatic developments but by the end of the year the Allies had succeeded in stopping the Axis advances and could start the slow process of rolling them back.

The battles of 1942 are very popular topics for wargames because of their inherent drama and because, I think, so many of the battles were pretty even. I'm going to try to note these as the anniversary dates approach -- and also 1862 for the Civil War 150th and try to get at least some commemorative games played.