Showing posts with label Second World War at Sea. Show all posts

Tuesday, June 5, 2012

USS Yorktown under attack during the Battle of Midway

Today is the 70th anniversary of the first and most critical day of the Battle of Midway.

On the one hand, the battle is among the best remembered of the war because of its obvious importance and the high drama of the situation and how it played out.  You had an enormous Japanese fleet, heretofore highly successful, being defeated in the most dramatic fashion possible by the outnumbered, plucky Ameircans.

that's certainly the popular image anyway, as shown by Hollywood  in the movie Midway and in popular books such as Incredible Victory and Midway: The Battle that Doomed Japan.

Of course more recent scholarship, most vividly in Shattered Sword, shows that it wasn't quite as one-sided a situation as all that and that the odds were not as much against the United States as the raw numbers might suggest.

This is no news to wargamers, of course. Midway is one of the original, classic wargame situations in the hobby, ever since the seminal Avalon Hill game Midway appeared in 1964. The appeal of Midway, from a wargaming standpoint, is that it's not only an important battle, but a remarkable even one. Yes, the Japanese had a large fleet, but at the critical point the two sides were very comparable in strength. The Japanese carrier task force was comprised of four fleet carriers carrying 225 aircraft escorted by five battleships and cruisers while the American task force was comprised of three fleet carriers with 233 aircraft and an escort including eight cruisers. The island of Midway formed a fourth "aircraft carrier" with another 81 combat aircraft.

Each side had advantages. For the Japanese this included highly trained and experienced aircrew with  first-rate planes using  advanced carrier doctrine and techniques. For the Americans there was the advantage of code-breaking and superior damage control. While the Japanese held an advantage in plane quality generally, the American Wildcats were learning to hold their own against the Zero and the Dauntless Divebombers were excellent.

Perhaps nothing helped the Americans more than their good luck and some good leadership. The key decision by Wade McClusky leading the Enterprise divebombers to follow an errant Japanese destroyer to the carriers and the fortuitous timing of the various uncoordinated American attacks created the conditions for victory.

But no one can read the details of how this all happened without seeing that it could very easily have turned out the other way. The Hornet divebombers strike, for example, completely missed the Japanese fleet and ended up landing on midway. If the Enterprise strike had done likewise then only the Yorktown's strike would have ended up finding the Japanese fleet. That attack sunk the Kaga. Historically the counterstrike by the Hiryu was enough to sink the Yorktown, but what would have happened if there had been three surviving Japanese carriers available to launch? We can't know for sure, of course, but Capt. Wayne Hughes analysis in the book Fleet Tactics suggests that under the conditions of 1942 carrier battles each carrier deck load could be expected to sink or disable one opposing carrier on average. So it's quite likely that the US might have lost all three of the Yorktown class ships on the afternoon of June 4th. 

Midway itself probably would not have fallen, as the projected Japanese invasion force seems wholly inadequate to defeat the marines present on the base, but the Japanese would have been well-placed to follow up their success. Certainly there would have been no Guadalcanal campaign as the United States would have had to husband its remaining carrier assets (primarily the Saratoga and the Wasp) until the Essex class ships started to arrive.

The Japanese naval aviation would also have been in much better shape as there would have been no heavy attrition in the Solomons and the carrier pilots would have been kept aboard their carriers.

As to whether the Japanese would have ultimately prevailed, it's hard to say. They still had to cope with the fact that their industrial strength was inadequate to compete with America over the long haul, but they would have had many opportunities to make the long and challenging drive across there Pacific and even longer and more challenging affair -- at least until the atom bomb weighed in.

For me, personally, Midway has always been one of my favorite topics in wargaming. My very first wargame was Avalon Hill's Midway, which I still think is one of the best classic wargames. I also have a half-dozen other Midway wargames as well.

Tuesday, May 8, 2012

The Other Shoe drops -- Lexington sunk 70 years ago

USS Lexington afire after being hit during the Battle of Coral Sea on May 8, 1942.
 
On the morning of May 8 both carrier forces spotted each other and launched strikes, and while both strikes found their opponents the more experienced Japanese aviators got the better of the exchange.  Both the USS Yorktown and the USS Lexington were hit, while only the Shokaku was hit in return.

While the Shokaku and the Yorktown ended up surviving their hits, the Lexington was hit by at least two bombs and, more critically, by two torpedoes. As it turned out in the Pacific war, torpedoes were the bane  of American aircraft carriers. Every US fleet carrier that was lost was lost after receiving torpedo hits.

While the Japanese got the better of the tactical exchange, however, from a strategic standpoint things were quite different. The Americans hurriedly repaired the Yorktown and it was available for the Battle of Midway less than a month later. Meanwhile the Shokaku's damage took much longer to repair and the Zuikaku, while undamaged, had taken such heavy losses in its air group that it also missed out the key Battle of Midway. Overall, the Japanese would have been much better served by skipping the whole affair. Having all six fleet carriers for Midway would have been a big advantage, even if the Americans retained the Lexington. The US Navy in mid-1942 had not developed doctrine or experience in operating carriers together (indeed, the pairing of the Enterprise and Hornet at Midway was an innovation for the Americans) so having four carriers would have been an awkward situation. In contrast, the Japanese had highly honed their capability to operate all six fleet carriers as a unified force. A 6-4 edge in carriers would have been much better than the 4-3 advantage they had in the actual event.

In June a new Essex-class carrier being built in Massachusetts was renamed the Lexington (CV-16) in honor of the lost ship. The other three fleet carriers lost later in 1942 -- the Yorktown, Hornet and Wasp -- would likewise be memorialized by new Essex class ships (CV-10, CV-12 and CV-18, respectively).

Monday, May 7, 2012

Battle of Coral Sea - 1942

The Shoho under attack during the Battle of Coral Sea, May 7, 1942


The Battle of Coral Sea started on this date, 70 years ago. Notable as the first naval battle in history where the opposing ships never sighted each other, the first day was marked by a number of blunders by both sides that included attacks on friendly ships, massive strikes launched against minor targets and even confused aircraft trying to join landing patterns on opposing carriers.

The score ended up being in the US favor as the sun set. While the fleet tanker Neosho and destroyer Sims were sunk, the Japanese lost the aircraft carrier Shoho and called off their planned amphibious landing at Port Moresby.

The Shoho was attacked by more than 90 aircraft that gave the Americans some dramatic photographs and the catch phrase "Scratch one flattop!'

Coral Sea is well covered by wargames, among them are SOPAC from the Second World War at Sea, The Fires of Midway and the classic Avalon Hill game Midway through its Coral Sea expansion kit.

Thursday, May 19, 2011

Bismarck saga -- German destroyers

Narvik-class German destroyer

Around 11:30 p.m. on May 19 a third German destroyer joined the Bismarck's task force as it got ready to pass through the narrow waters between Denmark and Sweden.

It may be wondered why no destroyers accompanied the Bismarck and Prinz Eugen on their foray. Surely a flotilla of escorts would have been useful.

In fact, however, destroyers were inherently limited in ways that precluded using them on long-range commerce-raiding missions. They were small ships which limited the amount of fuel they could carry -- but being tactically useful required them to move fast, which burned prodigious amounts of fuel. In addition the very rough sea conditions common in the North Atlantic often meant they had to slow down in order to avoid serious damage. In many cases a battleship or cruiser could move through stormy seas faster than a destroyer. Being slowed by rough weather was tolerable when acting as an escort vessel -- the merchant ships were slower anyway and the rough seas affected them as well. Likewise the destroyer's main foe, submarines, was also a small vessel that was slow under water and above water was affected just as badly by rough weather.

Every navy found keeping destroyers fueled up a major challenge, but German destroyers, in particular, were short-legged, being designed for use close to home in the North Sea and Baltic. The Narvik class destroyers such as Z-23 were typical, having a range of just 2,180 nautical miles at a speed of 19 knots. In comparison, standard British destroyers like the J, K & L class or the Tribal class destroyers that harried the Bismarck in its final hours had a range of more than 5,000 nautical miles at a sped of 15 knots. Even so, there were several instances during the Bismarck operation where British destroyer operations were affected by fuel considerations.

This is illustrated in the Avalanche Press Second World War at Sea series game Bismarck where the destroyer Z-23 has just 5 fuel boxes while the tribal-class destroyer Zulu has 6 and the JKL-class DD Javelin has 7 fuel boxes. In SWWAS a box provides enough fuel to travel 24 squares on the operational map -- at 1 square per turn! A square represents 36 nautical miles. If, on the other hand, a destroyer goes at its top speed of 3 it will use half of a box in that one turn and the entire box on the next. The Bismarck has 13 fuel boxes -- enough to travel up to 312 zones at slow speed. The purpose-built commerce raiding pocket battleships such as the Admiral Scheer have 22 fuel boxes, enough for 528 zones and transoceanic range.

As we will see, even larger ships such as cruisers, battleships and aircraft carriers, often had fuel problems.

No, the Bismarck, which had a range of more than 8,000 miles at 19 knots and the Prinz Eugen, 7,000 nautical miles at 20 knots, were on their own once they left waters close to Germany. Even their much longer cruising ranges were insufficient for a war cruise and they relied on access to hidden German tankers to refuel at sea and remain on station long enough to be a threat.

Thursday, February 17, 2011

More evidence caution might have been in order ...


For a battle that never happened the incident involving Convoy HX-106 is actually pretty well represented in naval games.

It's Battle Scenario Two in Second World War at Sea: Bismarck, which Game Store Tony and I had already fought on the anniversary of the battle on Feb. 8 using Mongoose Publishing's Victory at Sea rules. In that battle the Germans were not able to turn their advantage in speed and gun range into a winning edge when the Scharnhorst misjudged its approach and got within range of the HMS Ramillies larger, although shorter-ranged guns.

In the SWWAS system the Germans ships' range advantage disappears, as all primary guns have the same range of 6 hexes on the tactical map. Perhaps in compensation, the victory conditions for the Germans are considerably relaxed. In order to win the British have to eliminate all the primary gun hit boxes on one of the battlecruisers, which is quite a bit more damage than the 10% required in the previous scenario.

As I noted last time, the convoy escort historically did not include the four destroyers shown in the Atlantic Navies version of the scenario. The printed Bismarck scenario does not include the destroyers, but it does include an armed merchant cruiser which also was not present on Feb. 8. While there had been an AMC with the convoy, it had left a few days before. Historically the sole escort for the convoy was the battleship. As before, I went ahead and left in the ahistorical addition to the outnumbered British OB. The historical convoy comprised 41 ships. This scenario has 40 "large" transports (2 hull hit boxes each), with the AMC counting as the 41st for victory conditions.

For the Germans to win they had to avoid the crippling damage noted above while sinking the British battleship and at least 10 merchants within four "rounds" (88 impulses). In SWWAS ships move in only some impulses depending upon speed and initiative status but get to fire in every impulse. What that meant in this scenario was that the slow British battleship was not going to get too many opportunities to adjust its position during the battle while the speedy German warships would move on most impulses.

The British were required to set up all their ships in the center hexes of the tactical map with five of the hexes having 8 transports each. I put the AMC in the lead hex while the Ramillies brought up the rear. My plan largely constrained by the scenario special rules, which required each British warship to close on an enemy ship. There's little reason to do otherwise. I planned to let the AMC harass the battlecruiser in front while the Ramillies would try to take out the one to the rear. I planned to have all the transports rush to the rear as well, hoping that the German ship in that sector would be too busy with the battleship to shoot at them.

As per the scenario instructions the German ships started on opposite sides of the map, with the Gneisenau to the front and the Scharnhorst to the rear.

As per the plan, the AMC bravely rushed forward and yapped at the heels of the Gneisenau, while the Gneisenau resolutely ignored it. The AMC picked off both tertiary hit boxes on the battlecruiser but after that could do no damage. Eventually the German ship fired some secondaries at the AMC and knocked out one gun but otherwise the AMC was unhurt at the end of the scenario. The Gneisenau concentrated its main battery on the Ramillies and secondaries at merchants, sinking several.

Meanwhile the Scharnhorst and Ramillies engaged in a knock-down, drag-out slugfest that brought the British to a scenario win as the Ramillies completely demolished the topsides of the German ship, knocking out all the primary (6) secondary (4) and tertiary (2) boxes as well as nine of its 14 hull boxes. Oh, and it's speed was reduced to 2 as well.

It was a near-run thing, though, as the final hit box on the German ship was KOd during the same fire phase that the Ramillies lost its last hull box! At this point the Germans could not win the scenario and the game was called. At that point, besides the Ramillies, the British had lost 9 transports so the Germans were also close to a win.

Still, the outcome of the battle once again suggested that the German naval high command's reluctance to allow its heavy ships to take any risks fighting British battleships, no matter how elderly, was not so cowardly as it seems. There can be little doubt that such heavy damage to the Scharnhorst as depicted would send it home immediately, with some risk of not making it. It's likely that the Gneisenau would not stay out on its raiding mission alone and so the sacrifice of the Ramillies would not only save most of its own convoy, but would also save all the other potential targets of the German raiding force.

The Second World War at Sea tactical system is a crude tool to use for drawing any conclusions, but it did in this case confirm the result of the Victory at Sea battle. Next week I hope to revisit the engagement one more time, this time using Atlantic Navies for what could be the definitive refight.

The battle ended on the fourth or fifth impulse of the second round and took around 40 minutes to play out.

Friday, November 13, 2009

SOPAC Session Report Naval Battle of Guadalcanal I

On this anniversary (Nov. 13) of the 1942 First Naval Battle of Guadalcanal my stepson and I replayed the battle using SOPAC Battle Scenario No. 6.

It looked like a tough job for the Americans, so I gamely volunteered to take their side. After all, there were two posthumous Medals of Honor awarded to the two American admirals killed in the battle.

One thing became apparent during the setup was that the given setup was incorrect. As shown by Morison the American force was in one long column at the outset of the fighting, so it appears that the USN group listed as setting up in C5 is supposed to be in D5, so that's where we put them.


The US starts with the initiative, so the Japanese had to move first. The Battleship group cut to starboard while the Japanese all-destroyer group steamed straight ahead. The Americans took advantage of this opportunity to concentrate against a portion of the Japanese fleet and moved both groups in front of the Japanese force.

The exchange of gunfire was pretty even, with both sides taking an assortment of gun and hull hits, but ominously no torpedo mounts were knocked out. The USN elected not to fire torpedoes at this time, hoping to save them against the battleships, but the Japanese gleefully launched a salvo of 17 factors of Long Lances at the US force -- after all the Japanese had reloads! They also had luck, as each of the three leading US cruisers was hit by two torpedoes. Surviving even one Long Lance is tough, but with 2 it's almost impossible and all three US cruisers -- Portland, San Francisco and Atlanta -- went down. The two US admirals were likely casualties -- but unlikely Medal of Honor recipients under the circumstances.

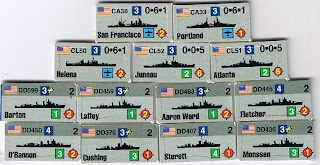
The US Force at the First Battle of Guadalcanal
Task Group 67.4 (Callaghan, Scott)

On the next impulse the Japanese battleships turned about to try to close on the US force while the Japanese destroyer force pulled back o reload torpedoes. The US fleet took advantage of its initiative to countermarch back towards the Japanese battleship force. The Helena-led force crossed the T of the battleships while the destroyers that had survived cruiser massacre faced the Japanese force broadside. Their prospects were grim because they were also within range of the Japanese destroyer force.

The Japanese force at the First Battle of Guadalcanal
Bombardment Force (Abe)

The gunbattle was again pretty even, as the US was able to do damage to most of the enemy ships fired at, and took some in return. Several US destroyers went down simply because of the volume of fire coming their way. Notably the USS Laffey survived a 14-inch hit that was a dud!

This time the Japanese force fired 22 factors of Long Lances at the US force. This time the Japanese luck wasn't quite so good, as the Helena was missed, as were a couple of destroyers. But three torpedoes clobbered the USS Juneau and the USS Fletcher and USS Monssen each took one. None of these were survivable hits.

The US force managed to get some measure of revenge at this point, firing a total of 7 torpedo factors from the surviving ships at the Hiei. (US torpedo factors are quartered in scenarios set before September 1943). Three hit the Japanese battleship and all three were good solid hits that just managed to sink the Japanese battleship (which had taken a couple of hull hits from the Helena's guns earlier.)

The cheers on the US ships were short-lived. Despite mentioning that the Japanese could retire with honor and victory assured, my stepson was having none of that, and announced his intention to run down the survivors without mercy. Which he did. And it didn't take long, either, just two more impulses as a matter of fact. While the US ships were able to score a few more hits, none were fatal, whereas the Japanese force just blasted away. The last US ship to sink under the waves was the USS Laffey.

The final score was 205 points for the Japanese (US force wiped out). The US got 84 points for sinking the Hiei. Kirishima was untouched. The US also picked up 5 victory points for hull hits on surviving Japanese ships (Nagara, Yukikaze, Asagumo and Inadzuma), for a total of 89 points.

The scenario didn't do a good job of recreating the historical battle. The US gunnery was nowhere as effective as it was historically, with most of the significant damage coming from torpedoes, which were ineffective in history. Likewise the Japanese torpedoes were far too deadly, sinking four of the US cruisers and a couple of destroyers. Japanese gunnery was also overwhelming. This illustrates the limitations of the tactical combat system in the Avalanche Press Second World War at Sea series, which seems overly deadly and allows too much efficiency in allocating fires. The actual battle -- while still the deadliest rumble during the war -- was far more confused and resulted in a much lower toll. Most ships had trouble finding targets, friendly fire was a problem and ships often masked the fire of friendly ships. The tactical system works better for daylight battles where both sides maintain command control, but is too simple to deal with a confused night melee like Guadalcanal I.