At 10:30 p.m. on May 26, 1941 a destroyer flotilla led by the already legendary Capt. Philip Vian appraoched the Bismarck. Comprised of four British Tribal-class DDs (Cossack, Sikh, Zulu and Maori) and the Polish-manned Piorun (British-made N-class DD), the flotilla would spend the night harassing the Bismarck with torpedo runs. About 20 torpedoes were fired altogether, but none hit. On the other hand, the Bismarck wasn't able to hit any of the attacking destroyers either.
This is probably due to Adm. Leutjens ill-advised order to keep the crew constantly at battle stations even when not under attack. Indeed, after the Battle of Denmark Strait, which was notable for very accurate German gunnery, the entire rest of the campaign was marked by very poor German shooting. None of the 24 Swordfish that attacked the Bismarck in two strikes was shot down. None of Vian's destroyers were hit. Neither the Prince of Wales nor the Sheffield were hit directly when the Bismarck fired at them. During the final battle on May 27 the Bismark one again scored no hits at all.
Thursday, May 26, 2011


Bismarck saga -- Luck runs out
 Fairy Swordfish are shown flying over the Ark Royal
At 8:47 p.m. the British Swordfish flight catches up to the Bismarck. While the flight leader had planned to launch a coordinated attack, the worsening weather conditions and heavy AA fire from the Bismarck conspired to break up the attack into disjointed runs in small groups.
Only one of the first 14 torpedoes fired hits the Bismarck, square amidships -- just like the Victorious strike -- and as in the previous case the German torpedo protection system and armor belt was enough to keep the damage from the small 18-inch aerial torpedo carried by the Swordfish to a minimum.
Just as it appeared that the Bismarck might escape, the 15th Swordfish made its run. Fatefully, the Bismarck attempted to turn away from the torpedo, a maneuver that proved to be a mistake as instead of hitting the well-armored middle of the ship, the torpedo struck at the very stern of the ship. It would be decades later before the true nature of the damage suffered by this hit was discovered when Dr. Robert Ballard located the wreck. It appears that the blat jammed her starboard rudder right into the propeller shaft. It's also possible that the blast blew off the port rudder. The Germans didn't know what they were dealing with, but this was a scale of damage unrepairable at sea. The Bismarck was doomed. It was 9:05 p.m.
At 9:30 p.m. the Sheffield runs up on the slowed Bismarck, which opens fire at 15,000 yards. No direct hits are scored on the cruiser, but splinters from near misses kill several crewmen and knock out the ship's radar set. The Sheffield is able to determine that the Bismarck is steering an erratic course, the first indication that the British have that their quarry may not escape after all. Just a few minutes alter, at 9:40 p.m. the Bismarck notifies Berlin of its plight.
Bismarck saga -- shadowed again
At 3 p.m. The HMS Ark Royal, from Force H out of Gibraltar, launched a strike of 15 Swordfish torpedo bombers armed with torpedoes equipped with magnetic fuses.
The slow Swordfish take a long time to reach the vicinity of the Bismarck and at 4:10 p.m. they line up for torpedo runs -- at the wrong ship! The pilots hadn't been briefed that the HMS Sheffield, also from Force H, had been dispatched ahead to locate the Bismarck and was between the Ark Royal and the German battleship. The HMS Sheffield withheld fire and dodged some torpedoes, while some other torpedoes exploded on contact with the water because of faults with the magnetic fuses. The Swordfish returned to the Ark Royal, where the faulty fuses were replaced with standard contact fuses.
At 5:40 p.m. the British light cruiser HMS Sheffield, makes contact with the Bismarck and begins shadowing it at maximum radar range. Ark Royal moves closer to the Bismarck to cut down on the flying time while the third ship in Force H, the battlcruiser Renown, maintains its distance from the Bismarck. The British are unwilling to risk another battlecruiser, especially one older and weaker than the Hood, in a confrontation with the Bismarck.
At 7:10 p.m. the Ark Royal launches another strike, again with 15 Swordfish.
The slow Swordfish take a long time to reach the vicinity of the Bismarck and at 4:10 p.m. they line up for torpedo runs -- at the wrong ship! The pilots hadn't been briefed that the HMS Sheffield, also from Force H, had been dispatched ahead to locate the Bismarck and was between the Ark Royal and the German battleship. The HMS Sheffield withheld fire and dodged some torpedoes, while some other torpedoes exploded on contact with the water because of faults with the magnetic fuses. The Swordfish returned to the Ark Royal, where the faulty fuses were replaced with standard contact fuses.
At 5:40 p.m. the British light cruiser HMS Sheffield, makes contact with the Bismarck and begins shadowing it at maximum radar range. Ark Royal moves closer to the Bismarck to cut down on the flying time while the third ship in Force H, the battlcruiser Renown, maintains its distance from the Bismarck. The British are unwilling to risk another battlecruiser, especially one older and weaker than the Hood, in a confrontation with the Bismarck.
At 7:10 p.m. the Ark Royal launches another strike, again with 15 Swordfish.
There's the Bismarck!
 The RAF-manned Catalina that spotted the Bismarck on May 26, 1941
More than 24 hours had passed since the British last had a fix on the Bismarck's position when a an RAF PBY Catalina sea plane co-piloted by an American Ensign named Leonard Smith spotted a ship in the middle of the Atlatic at 10:30 a.m.
In a later interview Smith described what happened:
“[A]t 1010 I sighted what was first believed to be Bismarck. . . . I immediately took control from ‘George’ [the automatic pilot]; started slow climbing turn to starboard, keeping ship sited to port, while the British officer went aft to prepare [the] contact report. My plan was to take cover in the clouds, get close to the ship as possible; making definite recognition and then shadow the ship from best point of vantage. Upon reaching 2,000 feet we broke out of a cloud formation and were met by a terrific anti-aircraft barrage from our starboard quarter.”
The intense AA fire confirmed that the ship was, indeed, the Bismarck. The last 24 hours of the Bismarck's existence had begun.
Eventually the Catalina lost contact with the Bismarck, but by afternoon the British regained contact with the light cruiser HMS Sheffield and the Bismarck would never shake off its pursuers again.
Wednesday, May 25, 2011
Bismarck Saga -- Where's the Bismarck?

The 25th of May was probably the most nerve-wracking period of the entire Bismarck escapade for the British. After the Bismarck eluded its pursers early that morning the British frantically searched for the .German battleship. Their only clue was an intercepted radio report from Luetjens that described the Battle oft he Denmark Straits. One wonders why the German admiral took the chance of being triangulated when he had just so clverly outfoxed the British. It's possible he though he was still being shadowed, although there's no direct evidence of that. It was a reckless move, but in keeping with the peculiarly lax German attitude toward operational security which had characterized their operations so far.
On the other hand, the intercepted message and the triangulated position, while better than nothing, were not enough to actually find the German battleship. The best they could do was cut down the area being searched, but the open ocean is immense and even a 41,000-ton, 823-foot-long battleship is quite tiny in the middle of the ocean.
Heraklion -- sides switch, results don't

So a few days after the first game the same opponent and I sat down for a refight of the Herkalion scenario from the Axis & Allies Expanded rules book. The last battle saw a handy British victory, despite the fact we made a set up error that favored the Germans.
Given that history I viewed my chances with some skepticism and events proved it to be warranted.
The error we made before involved overlooking the requirement that no German units be set up adjacent to each other. This was a heavy burden, as it essentially forced the Germans into a broad front attack. I thought I'd try to make lemonade from that lemon by planning on an enveloping attack on the village while the Veteran Fallschirmjaeger took advantage of his special ability to move while disrupted to head for the board edge victory hexes, which I though was the most promising route to victory.
That plan didn't survive the British setup however, as BOTH British heavy firepower units -- the Vickers and the Bofors, set up in the woods south of the pond to cover the entire open southern approach route. While this risked a quick elimination, it also seemed to make a rush across the open ground suicidal so long as they survived. The British set up the Bren gunner, the Aussie soldier and an SMLE rifleman on the ridge north of the village. Inside the village were the rest of the SMLE and the three Greeks.
I set up the light mortar in the small patch of woods in the north, the expert sniper int he bluffs and the MG-34 in the southern woods. The other troops set up on open ground ready to dash to cover -- two regular FJ and the hero in the north and the other FJ and the veteran FJ in the south.
Unfortunately for the Germans the British won the first few initiative rolls, which meant the Bren gunner was very useful suppressing the mortar until it could be killed. The sniper and the MG 34 took out the Bofors and Vickers, but it took until the end of Turn 2, which meant that there wasn't enough time for any Germans to reach to board edge victory area. Forced by lack of time to attack the town the German paratroopers made a valiant effort, but there were too many British targets and they found a lot of cover as well. Meanwhile the Germans continued to drop and by Turn 6 all that remained was one FJ, the sniper and the MG 34 team and no mathematical chance of controlling the village.
Overall this appears to be a tough scenario for the Germans. The point differential is misleading, because the Germans don't get to use their paratrooper SA. I'd add a couple more FJ to the OB or perhaps another MG team. Another possibility would be to give the Germans am Early War Stuka in support. This would be in keeping with the theme.
Bismarck saga -- air attack
The HMS Victorious was still in the process of working up its air group when it was deployed along with the Home Fleet to counter the Bismarck breakout. It was understrength and inexperienced -- but it was also all that was available early on the morning of May 25.
Nine Swordfish torpedo planes took off from the Victorious to launch an attack on the Bismarck, reaching the battleship about 12:15 a.m. t first the inexperienced Swordfish pilots lined up on the U.S. Coast Guard Cutter Modoc, which happened to be near the Bismarck. That the plots could mistake the much smaller US ship for the battleship is telling and suggest how had it would have been for them to single out the Bismarck if the Prinz Eugen was still accompanying it.
In any case the Swordfish sorted out their error and made runs at the Bismarck. Interestingly the Bismarck's anti-aircraft fire was not able to shoot down any planes. It's been suggested that the ancient biplanes were too slow for the Bismarck's modern AA fire control to track! In any case, none were shot down and the British even managed to score a torpedo hit amidships. The 18-inch weapon wasn't able to penetrate the Bismarck's armored belt, however, and damage was slight.
At 1:31 a.m. the Bismarck exchange fire with the Prince of Wales again, but no hits were scored. A few hours later, around 3:15 a.m. the Bismarck, through some cleverly timed maneuvering, gave the British shadows the slip as they zigged after a zag. After pulling out of radar range the Bismarck circled back behind the British pursuers and then set out towards France. It was quite some time before the British realized the Bismarck had given them the slip.
Nine Swordfish torpedo planes took off from the Victorious to launch an attack on the Bismarck, reaching the battleship about 12:15 a.m. t first the inexperienced Swordfish pilots lined up on the U.S. Coast Guard Cutter Modoc, which happened to be near the Bismarck. That the plots could mistake the much smaller US ship for the battleship is telling and suggest how had it would have been for them to single out the Bismarck if the Prinz Eugen was still accompanying it.
In any case the Swordfish sorted out their error and made runs at the Bismarck. Interestingly the Bismarck's anti-aircraft fire was not able to shoot down any planes. It's been suggested that the ancient biplanes were too slow for the Bismarck's modern AA fire control to track! In any case, none were shot down and the British even managed to score a torpedo hit amidships. The 18-inch weapon wasn't able to penetrate the Bismarck's armored belt, however, and damage was slight.
At 1:31 a.m. the Bismarck exchange fire with the Prince of Wales again, but no hits were scored. A few hours later, around 3:15 a.m. the Bismarck, through some cleverly timed maneuvering, gave the British shadows the slip as they zigged after a zag. After pulling out of radar range the Bismarck circled back behind the British pursuers and then set out towards France. It was quite some time before the British realized the Bismarck had given them the slip.
Tuesday, May 24, 2011
Some thoughts on Denmark Strait
The Battle of the Denmark Strait was one of the most dramatic episodes in World War II, which had no shortage of drama. As such it's one of the most popular topics for wargames, dating all the way back to Avalon Hill's original Bismarck game in 1961.
As an operational game the Bismarck campaign has a lot of potential and has successfully been made into games several times. The Battle of Denmark Strait, however, presents somewhat of a problem. It's really hard to fit it into a wargame format.
Today, for example, I played out the Denmark Strait matchup three times with two different players using Axis & Allies War at Sea. Now, WAS is admittedly not the first word in simulation. But the four ships involved in the historical battle are explicitly represented int he game, and most of them have special abilities that are explicitly modeled on what happened at this battle. And still there was really no context, as the Bismark and Prinz Eugen were handily defeated thrice. In game terms this isn't surprising, because the two German ships add up to 70 points while the British pair top out at 102 points. Yet one has to wonder whether this is a problem with the game or actually a reflection of the historical improbability of the actual result.
In the Avalanche Press Second World War at Sea series game Bismarck the Bismarck and Prinz Eugen add up to 151 points while the Prince of Wales and Hood are 165 points -- closer, but still showing an edge for the British. (And also not including the two shadowing British cruisers). Considering that all the British need do is achieve significant damage to the Bismarck and they win and the straight point value seems to understate the British edge.
Mongoose Publishing's Victory at Sea rules have Fleet Allocation Points. If we consider the Denmark Strait to be a "Raid" level scenario than the German fleet is worth 5 FAP and the British squadron is worth 8 FAP. Another way to look at the matcup is to note that the two German ships will be rolling a total of 12 dice with a potential maximum of 28 damage dice (24 of which are 'AP') contrasted with the British battle line salvo of 18 dice with 44 potential damage dice (all AP).
At the high end of the realism scale with the Command at Sea system there's no point system at all, but the design notes for the Denmark Strait point out that the chance of the hit that blew up the Hood happening under the CaS rules comes out to .00016! That's a 1 in 6,250 chance. They say" This is small comfort for the crew of the Hood, but it demonstrates the difficulty in duplicating a historical result."
So the bottom line is that by any reasonable measure of likelihood the Bismarck's sortie should have come to an abrupt and aborted end that early morning inf May, 1941. The British strategy for dealing with a potential raid would had worked perfectly. The raiders were spotted before they even left Norway. Appropriate and effective deployments were made. The cruiser pickets successfully detected the German breakout attempt and shadowed it superbly. A more than adequate countering force intercepted just as the British planned and was literally a few minutes away from closing the range enough that the Hood's weak deck armor would no longer be an issue. Most wargame refights of Denmark strait -- whether using the super detailed Command at Sea or the highly abstracted War at Sea -- will reflect this reality. The Bismarck should lose.
Had it played out that way in reality, the Bismarck affair would have played a much smaller role in the lore of World War II, probably ranking somewhere below the exploits of the Graf Spee and Scharnhorst.
But one shell hit changed all that. The dramatic destruction of the Hood instantly changed the odds in the battle and combined with the Prince of Wales teething troubles and the mental shock of the Hood's loss allowed the Bismarck to break out and created the high drama that captured the public imagination.
As an operational game the Bismarck campaign has a lot of potential and has successfully been made into games several times. The Battle of Denmark Strait, however, presents somewhat of a problem. It's really hard to fit it into a wargame format.
Today, for example, I played out the Denmark Strait matchup three times with two different players using Axis & Allies War at Sea. Now, WAS is admittedly not the first word in simulation. But the four ships involved in the historical battle are explicitly represented int he game, and most of them have special abilities that are explicitly modeled on what happened at this battle. And still there was really no context, as the Bismark and Prinz Eugen were handily defeated thrice. In game terms this isn't surprising, because the two German ships add up to 70 points while the British pair top out at 102 points. Yet one has to wonder whether this is a problem with the game or actually a reflection of the historical improbability of the actual result.
In the Avalanche Press Second World War at Sea series game Bismarck the Bismarck and Prinz Eugen add up to 151 points while the Prince of Wales and Hood are 165 points -- closer, but still showing an edge for the British. (And also not including the two shadowing British cruisers). Considering that all the British need do is achieve significant damage to the Bismarck and they win and the straight point value seems to understate the British edge.
Mongoose Publishing's Victory at Sea rules have Fleet Allocation Points. If we consider the Denmark Strait to be a "Raid" level scenario than the German fleet is worth 5 FAP and the British squadron is worth 8 FAP. Another way to look at the matcup is to note that the two German ships will be rolling a total of 12 dice with a potential maximum of 28 damage dice (24 of which are 'AP') contrasted with the British battle line salvo of 18 dice with 44 potential damage dice (all AP).
At the high end of the realism scale with the Command at Sea system there's no point system at all, but the design notes for the Denmark Strait point out that the chance of the hit that blew up the Hood happening under the CaS rules comes out to .00016! That's a 1 in 6,250 chance. They say" This is small comfort for the crew of the Hood, but it demonstrates the difficulty in duplicating a historical result."
So the bottom line is that by any reasonable measure of likelihood the Bismarck's sortie should have come to an abrupt and aborted end that early morning inf May, 1941. The British strategy for dealing with a potential raid would had worked perfectly. The raiders were spotted before they even left Norway. Appropriate and effective deployments were made. The cruiser pickets successfully detected the German breakout attempt and shadowed it superbly. A more than adequate countering force intercepted just as the British planned and was literally a few minutes away from closing the range enough that the Hood's weak deck armor would no longer be an issue. Most wargame refights of Denmark strait -- whether using the super detailed Command at Sea or the highly abstracted War at Sea -- will reflect this reality. The Bismarck should lose.
Had it played out that way in reality, the Bismarck affair would have played a much smaller role in the lore of World War II, probably ranking somewhere below the exploits of the Graf Spee and Scharnhorst.
But one shell hit changed all that. The dramatic destruction of the Hood instantly changed the odds in the battle and combined with the Prince of Wales teething troubles and the mental shock of the Hood's loss allowed the Bismarck to break out and created the high drama that captured the public imagination.
Bismarck saga -- Prinz Eugen escapes
sat 6:15 p.m. the Bismarck confronts its pursuers, the battleship Prince of Wales and the cruisers Norfolk and Suffolk and shots are exchanged -- although no hits. This skirmish provides cover for the Prinz Eugen which speeds up and pulls out of radar range and escapes.
The Prinz Eugen later meets up with a tanker and refuels, but is unable to locate any convoys because the British have diverted them away from the PE's likely hunting grounds. On the 29th the cruiser developed a problem with its engines and headed for France uneventfully. On June 1 the cruiser reached Brest.
One decision I haven't seen examined much was this detachment of the Prinz Eugen. The ship didn't accomplish much and wasn't well suited for the raider role anyway. I wonder if it wouldn't have been better to have the PE continue to accompany the Bismarck. A the very least it added some AA capability. Also worth considering is the possible benefit of having another ship present to confuse attacking aircraft. As it we will see, the aircraft attacking the Bismarck were prone to mistaken identity attacks anyway -- in one case lining up to hit a small American coast guard cutter and in the second case actually attacking a British light cruiser. How much more likely would be a mistaken attack if there were two ships in the same vicinity as similar-appearing as the Prinz Eugen and the Bismarck? As it was, it was just a lucky shot that finally doomed the German battleship. Perhaps if it had been present the Prinz Eugen could have been the unlucky one. In any case, it would have been useful to force the British to divide up their meager air assets -- a total of 24 Swordfish were available between the two British carriers.
The Prinz Eugen later meets up with a tanker and refuels, but is unable to locate any convoys because the British have diverted them away from the PE's likely hunting grounds. On the 29th the cruiser developed a problem with its engines and headed for France uneventfully. On June 1 the cruiser reached Brest.
One decision I haven't seen examined much was this detachment of the Prinz Eugen. The ship didn't accomplish much and wasn't well suited for the raider role anyway. I wonder if it wouldn't have been better to have the PE continue to accompany the Bismarck. A the very least it added some AA capability. Also worth considering is the possible benefit of having another ship present to confuse attacking aircraft. As it we will see, the aircraft attacking the Bismarck were prone to mistaken identity attacks anyway -- in one case lining up to hit a small American coast guard cutter and in the second case actually attacking a British light cruiser. How much more likely would be a mistaken attack if there were two ships in the same vicinity as similar-appearing as the Prinz Eugen and the Bismarck? As it was, it was just a lucky shot that finally doomed the German battleship. Perhaps if it had been present the Prinz Eugen could have been the unlucky one. In any case, it would have been useful to force the British to divide up their meager air assets -- a total of 24 Swordfish were available between the two British carriers.
Monday, May 23, 2011
Battle of Denmark Strait -- May 24, 1941
 Bismarck firing during the Battle of the Denmark Strait
At 5:37 a.m. the German task force detects the approaching British battleships at a range 0f 17 miles. At first the Germans believe that the approaching ships are more cruisers, sent to relieve the pair that have been shadowing the Bismarck since late the day before.
At 5:50 a.m. the Germans identify the approaching ships as the HMS Hood and a King George V class battleship (They don't realize the Prince of Wales is operational.)
5:52 a.m. the Hood and Prince of Wales open fire. Adm. Tovey orders both ships to fire on the lead German ship, which he believes is the Bismarck., based on earlier reports from the Norfolk and Suffolk and the similarity in profile between the two German ships. The gunnery officer on the Prince of Wales, however, realizes the mistake and that ship opens fire on the Bismarck.
5:54 a.m. Prinz Eugen opens fire on the Hood and scores a hit on the first salvo. starting a fire amidships.
 Bismarck fires on the Hood
5:55 a.m. Bismarck opens fire on the Hood.
5:57 a.m. Prinz Eugen shifts fire to the Prince of Wales on its sixth salvo.
The Prince of Wales' firepower has been reduced to 4 guns because of a malfunction of the "B" turret (which has 2 guns) after the first salvo. The Bismarck and Prinz Eugen can fire full broadsides at the approaching British ships, which can only fire their forward guns in turn.
5:59 a.m. The Bismarck has now straddled the Hood and fires three salvos at maximum rate of fire.
 The Hood explodes, as seen from the Prinz Eugen
6:00 a.m. A shell from the Bismarck its the Hood near the stern, apparently penetrating the thin deck armor and exploding in a magazine servicing the Hood's 4-inch guns. The ensuing blast sets off the main battery magazine under the X turret and then the Y turret a split second later, blowing the ship in two. An enormous billowing cloud of smoke marks the spot and the two ends of the Hood form a huge V and the ship quickly sinks. There would be only three survivors.
6:02 a.m. Bismarck switches fire to the Prince of Wales, scoring hits. The Prince of Wales also finds the range and starts hitting the Bismarck. Prince of Wales, right, makes smoke to escape while a pall of smoke, left, marks the sinking of the Hood
 Prince of Wales, right, makes smoke to escape while a pall of smoke, left, marks the sinking of the Hood
6:05 a.m. The Prince of Wales is getting the worst of the exchange of fire, being hit multiple times by both Germans ships. It makes smoke and pulls away. The fire of the Prinz Eugen is interrupted as the Bismarck pulls ahead of the cruiser.
6:03-6:14 a.m. The Germans ships maneuver to avoid reported torpedo wakes, although there's no indication that either British ship fired any.
6:09 a.m. Bismarck ceases fire. At first it appears that one of the three hits scored by the Prince of Wales was significant, but soon damage control reports an oil slick and a shot that passed though the bow of the German battleship is letting in a considerable amount of water, causing it to be down at the bow and labor a bit in the heavy seas.
Bismarck saga -- discovered
At 7:22 p.m. the British heavy cruiser HMS Suffolk spots the Bismarck as the German task forcve tries to run the Denmarck Strait between the ice pack off Greenland the the minefields off Iceland. The Suffolk is not spotted right away and ducks into some fog, getting off a contact report. The Suffolk notes that the Bismarck is in the lead, followed by the Prinz Eugen.
Soon the heavy cruiser HMS Norfolk joins the Suffolk and the two cruisers shadow the Germans.
At 8:30 p.m. a break in visibility allows the Bismarck to spot the Norfolk and it sends a few rounds at the British ship, which ducks into the mist. No hits are scored, but the blast from the guns damages the Bismarck's forward radar, so the battleship switches positions with the Prinz Eugen, which now leads. The British don't spot the change. This will have an impact a few hours later.
The two British cruisers will continue to shadow the German task force through the night using the radar on the Suffolk track their course while remaining outside of visibility range.
Soon the heavy cruiser HMS Norfolk joins the Suffolk and the two cruisers shadow the Germans.
At 8:30 p.m. a break in visibility allows the Bismarck to spot the Norfolk and it sends a few rounds at the British ship, which ducks into the mist. No hits are scored, but the blast from the guns damages the Bismarck's forward radar, so the battleship switches positions with the Prinz Eugen, which now leads. The British don't spot the change. This will have an impact a few hours later.
The two British cruisers will continue to shadow the German task force through the night using the radar on the Suffolk track their course while remaining outside of visibility range.
Sunday, May 22, 2011
Bismarck Saga -- Tovey sails
Vice Adm. Sir John Tovey, commander of the Home Fleet, leaves Scapa Flow at 11 p.m. in his flagship the King George V with the aircraft carrier Victorious.
Although the KGV is a powerful ship, it's still suffering from some teething problems, especially with its main battery mounts. The Victorious is a new carrier, but its effectiveness is much less than one would expect because its air group was inexperienced and understrength -- but the emergency was too great to leave it behind.
Although the KGV is a powerful ship, it's still suffering from some teething problems, especially with its main battery mounts. The Victorious is a new carrier, but its effectiveness is much less than one would expect because its air group was inexperienced and understrength -- but the emergency was too great to leave it behind.
Saturday, May 21, 2011
Bismarck Saga - close call
Around 8 p.m. the Bismarck task force left the Korsfjord and headed out to sea. Controversially, Admiral Guenther Luetjens decided to leave before the Bismarck's fuel tanks had been topped off.
Just a few hours later, at 12:15 a.m. on May 22, Vice Adm. Lancelot Holland (great name) left Scapa Flow with the HMS Hood and the HMS Prince of Wales. This was a much quicker reaction than German planning had assumed.
At 2 a.m. British aircraft attacked Grimstadfjord, but the Bismarck group had departed six hours earlier.
And early the next morning, at 4:20 a.m. the German destroyers escorting the Bismarck and the Prinz Eugen dropped away, returning to Norway.
Just a few hours later, at 12:15 a.m. on May 22, Vice Adm. Lancelot Holland (great name) left Scapa Flow with the HMS Hood and the HMS Prince of Wales. This was a much quicker reaction than German planning had assumed.
At 2 a.m. British aircraft attacked Grimstadfjord, but the Bismarck group had departed six hours earlier.
And early the next morning, at 4:20 a.m. the German destroyers escorting the Bismarck and the Prinz Eugen dropped away, returning to Norway.
Bismarck saga -- elsewhere the war goes on
 Maleme Airfield map detail from Hunters From the Sky
It's expedient for the purposes of narrative coherence in historical accounts to carry a story through from beginning to end, so naturally the story of the Bismarck normally doesn't discuss concurrent events elsewhere nor do histories dealing with topics such as the invasion of Crete normally mention the high drama in the Atlantic that was going on at roughly the same time.
But for Churchill, the Admiralty and other decision makers it was hard to give undivided attention to anything, a fact that armchair strategists and critics would do well to remember.
Even as the Bismarck lay in a Norwegian fjord, making final preparations for its sortie and the British admiralty began making its preparations to cope with that potential threat, the battle for Crete was raging. At almost the same moment that the British became aware that the Bismarck was at sea German glider troops and paratroopers were landing on Crete. While the Germans landed at several points, the key battle turned out to be at Maleme. The Capture of that airfield on May 21, 1941, was the turning point, as the Germans were able to start landing additional troops and heavy weapons.
Bismarck saga -- spotted again
 Aerial photo of the Bismarck
At 1:15 p.m. on May 21, 1941, the Bismarck was spotted by a reconnaissance Spitfire in Grimstadfjord, Norway.
Bismarck saga -- Norway
The Bismarck task force entered Korsfjord, near Bergen around 8 a.m. on May 21, 1941.
Friday, May 20, 2011
Last World War I combat veteran dies
News comes that the last veteran of World War I who served in action has died , 93 years after the end of the war.
The is a woman still alive in England who served as a uniformed waitress in England who is believed to be the last surviving "service member" from the Great War.
Shortly the war will have passed out of living memory for good.
World War II is just a couple decades behind -- if it's similar to the WWI story we will lose the last veteran of World War II somewhere around 2038-2040. God willing I may see that day, should I live to be 85.
The is a woman still alive in England who served as a uniformed waitress in England who is believed to be the last surviving "service member" from the Great War.
Shortly the war will have passed out of living memory for good.
World War II is just a couple decades behind -- if it's similar to the WWI story we will lose the last veteran of World War II somewhere around 2038-2040. God willing I may see that day, should I live to be 85.
Bismarck saga -- spotted
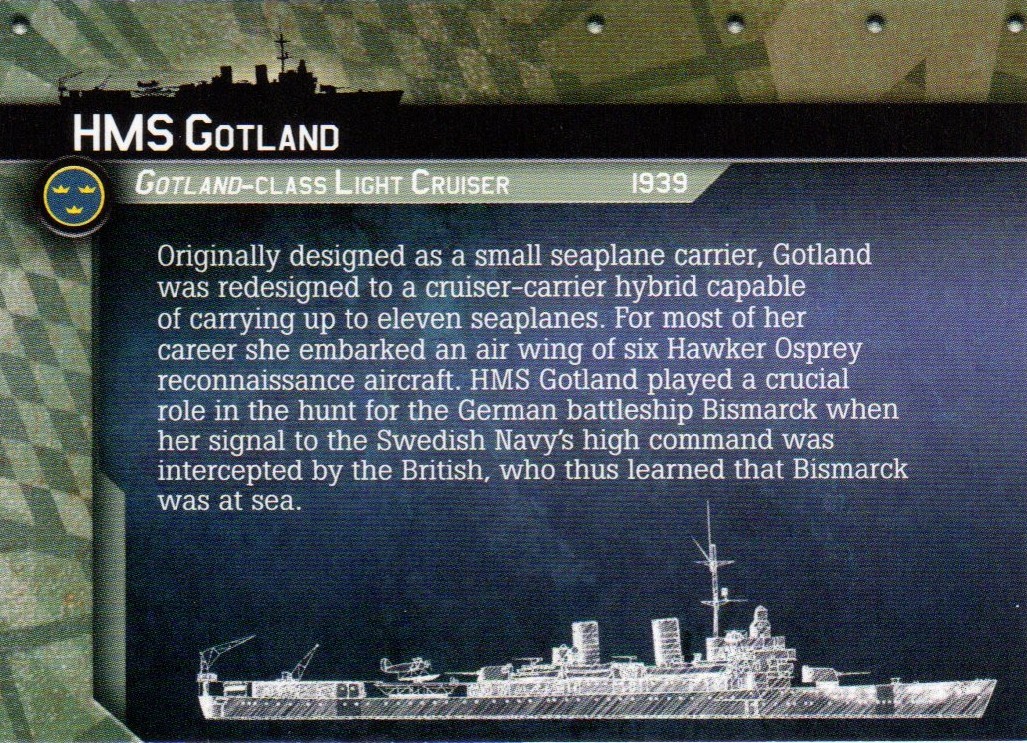 The Swedish warship Gotland as depicted in the Axis & Allies War at Sea naval miniatures game
Around 1 p.m. the Bismarck was spotted by the Swedish warship Gotland in the Kattegat, the sea region between Norway, Sweden and Denmark. As Sweden was a neutral power there was nothing the Bismarck could do about it and the Germans assumed that the British would learn about the Bismarck sortie from the Swedes. And, in fact, they did, although it's easy to overstate the impact of the Gotland's sighting report because it was just one of three, independent, sources that reported that the Bismarck was at sea. The British also learned about the sailing from an agent in Gotenhafen and from a spotting report from the Norwegian resistance.
The Gotland was an interesting and unique ship. Since the invention of flight there have been various attempts to combine the advantages of an aviation ship with the conventional capabilities of a surface warship. Some famous examples include the Japanese scout cruiser Chikuma, the Japanese hybrid battleship Hyuga, the French helicopter cruiser Jean Bart and the Russian ships Moskva and Kiev. Generally these experiments have come up short, with a vessel that's not robust enough for it surface role and yet inadequate in the aviation role compared to a dedicated ship.
The Gotland was on the small end for such hybrids at 4,600 tons, and was never tested in actual combat in its role of providing spotting aircraft for the nation's fleet of coastal battleships. It carried an air group of six recon float planes and a main battery of 6 6-inch guns. Yet in spotting the Bismarck the odd little cruiser arguable played a bigger wartime role than most other hybrids. While the British had reports from several sources that the Bismarck sailed, a spotting by a regular professional naval unit had to be considered definitive.
Thursday, May 19, 2011
Bismarck saga -- Danish waters
 A satellite view shows the Great Belt, in the center, through Denmark
About 2 a.m. on May 20 the Bismarck task force transited the Great Belt in Danish waters, taking about 4 hours.
Bismarck saga -- German destroyers
 Narvik-class German destroyer
Around 11:30 p.m. on May 19 a third German destroyer joined the Bismarck's task force as it got ready to pass through the narrow waters between Denmark and Sweden.
It may be wondered why no destroyers accompanied the Bismarck and Prinz Eugen on their foray. Surely a flotilla of escorts would have been useful.
In fact, however, destroyers were inherently limited in ways that precluded using them on long-range commerce-raiding missions. They were small ships which limited the amount of fuel they could carry -- but being tactically useful required them to move fast, which burned prodigious amounts of fuel. In addition the very rough sea conditions common in the North Atlantic often meant they had to slow down in order to avoid serious damage. In many cases a battleship or cruiser could move through stormy seas faster than a destroyer. Being slowed by rough weather was tolerable when acting as an escort vessel -- the merchant ships were slower anyway and the rough seas affected them as well. Likewise the destroyer's main foe, submarines, was also a small vessel that was slow under water and above water was affected just as badly by rough weather.
Every navy found keeping destroyers fueled up a major challenge, but German destroyers, in particular, were short-legged, being designed for use close to home in the North Sea and Baltic. The Narvik class destroyers such as Z-23 were typical, having a range of just 2,180 nautical miles at a speed of 19 knots. In comparison, standard British destroyers like the J, K & L class or the Tribal class destroyers that harried the Bismarck in its final hours had a range of more than 5,000 nautical miles at a sped of 15 knots. Even so, there were several instances during the Bismarck operation where British destroyer operations were affected by fuel considerations.
This is illustrated in the Avalanche Press Second World War at Sea series game Bismarck where the destroyer Z-23 has just 5 fuel boxes while the tribal-class destroyer Zulu has 6 and the JKL-class DD Javelin has 7 fuel boxes. In SWWAS a box provides enough fuel to travel 24 squares on the operational map -- at 1 square per turn! A square represents 36 nautical miles. If, on the other hand, a destroyer goes at its top speed of 3 it will use half of a box in that one turn and the entire box on the next. The Bismarck has 13 fuel boxes -- enough to travel up to 312 zones at slow speed. The purpose-built commerce raiding pocket battleships such as the Admiral Scheer have 22 fuel boxes, enough for 528 zones and transoceanic range.
As we will see, even larger ships such as cruisers, battleships and aircraft carriers, often had fuel problems.
No, the Bismarck, which had a range of more than 8,000 miles at 19 knots and the Prinz Eugen, 7,000 nautical miles at 20 knots, were on their own once they left waters close to Germany. Even their much longer cruising ranges were insufficient for a war cruise and they relied on access to hidden German tankers to refuel at sea and remain on station long enough to be a threat.
Subscribe to:
Posts (Atom)